FTC disclaimer: This post contains affiliate links and I will be compensated if you make a purchase after clicking on my link.
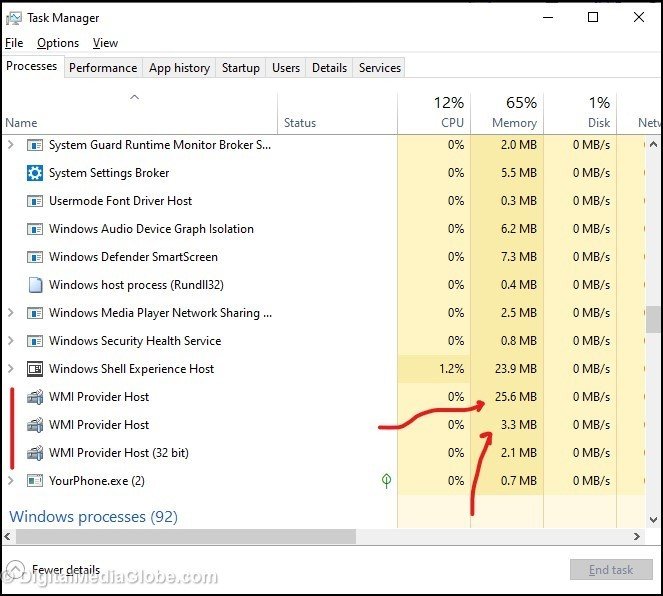
You would have noticed many times in a Taskbar, WMI Provider Host, using your memory and CPU. In different instances, you will observe that WMI Provider Host has high disk usage.
When the memory and CPU usage shoots up, your Windows PC will slow down. Sometimes, you will observe that WMI Provider Host is using 50% of the CPU power.
Is it normal to use High CPU by WMI Provider Host?
No! It means that some of your installed application is not working correctly. More importantly, the WMI Provider Host has a more vital role to play in the background.
It allows the application to request information about your system. This process usually won’t take much of your CPU and memory, although it will stop in the background after completion.
But, if it is running consistently, then it gets affected by the lousy application or maybe the Virus. So, before we go further, you would like to know what is WMI Provider Host.
What is WMI Provider Host (wmiprvse.exe)?
WMI Provider Host stands for “Windows Management Instrumentation Provider Host.” Most of the application which is running on Windows 10 request information and data that are stored by Operating System.
WMI Provider Host work is to provide information that is requested by different applications in different instances.
For any application to work smoothly, WMI Provider Host should be running. If you disable WMI Provider Host, most of the installed application becomes useless.
Why WMI Provider Host using so much CPU, Memory, and Disk Space?
Usually, WMI Provider Host doesn’t use much CPU and Memory. But, if it is using your CPU and Memory for a more extended period, then some of your applications are not behaving correctly.
We have to fix this issue to run WMI Provider Host normally.
Is WmiPrvSE.exe affected by viruses?
If your system is affected by viruses or Malware, you need to scan it with Antivirus. The good Antivirus will detect the program or application immediately and deactivate it.
The work of the Virus is to be as identical as the executable file. It is difficult to identify because it replaces the name and places itself in the same folder.
Once you have done a deep scan, it will isolate the program and eradicate it from your system.
If it has not solved, we will look for the fixes in the article below. You need to go through each repair mode one by one and ultimately identify the application that is creating an issue.
Fixes for WMI Provider Host
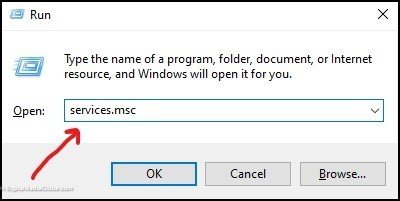
Fix 1: Restart WMI Provider Host and its associated services
Sometimes by merely restarting the WMI Provider Host may solve the problem. For this, you need to follow the steps below.
Step 1: Press Windows Key + R to start RUN and then type in “services.MSC”
Step 2.1: Now, you need to locate “Windows Management Instrumentation” from the list of services. After that, right-click on it and click “Restart.” It will restart the process of Windows Management Instrumentation.
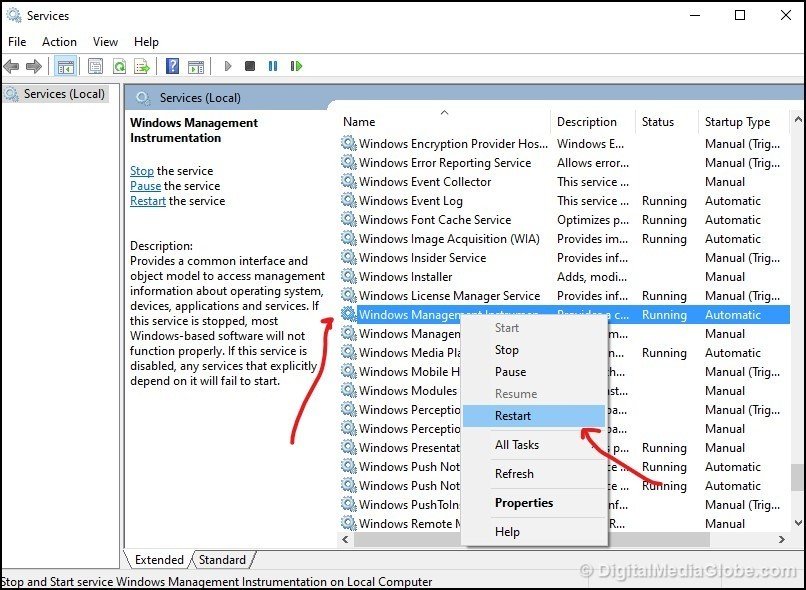
Step 2.2: Restart Associated Services
We also need to restart the process associated with Windows Management Instrumentation.
Step 2.2.1: Click Start and then type in Command Prompt in the search box and then click “Run as Administrator.”
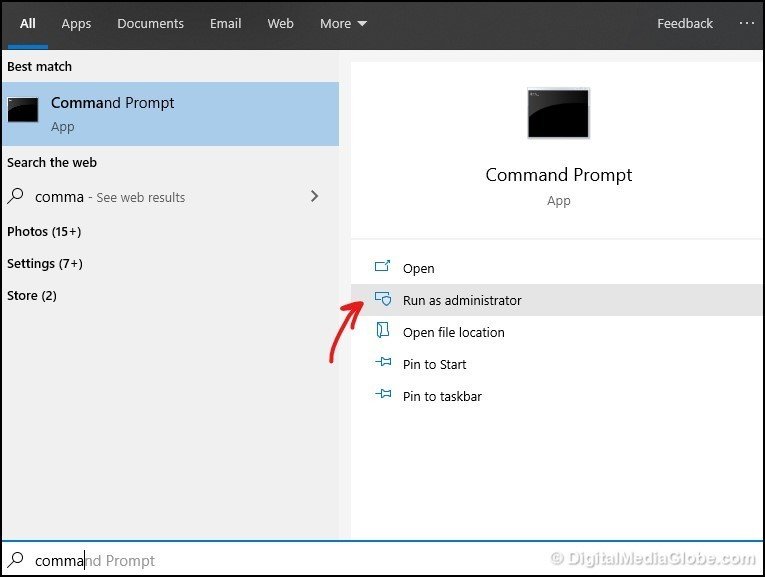
Step 2.2.2: You need to type in below command one by one and press enter.
net stop iphlpsvc
net stop wscsvc
net stop Winmgmt
net start Winmgmt
net start wscsvc
net start iphlpsvc
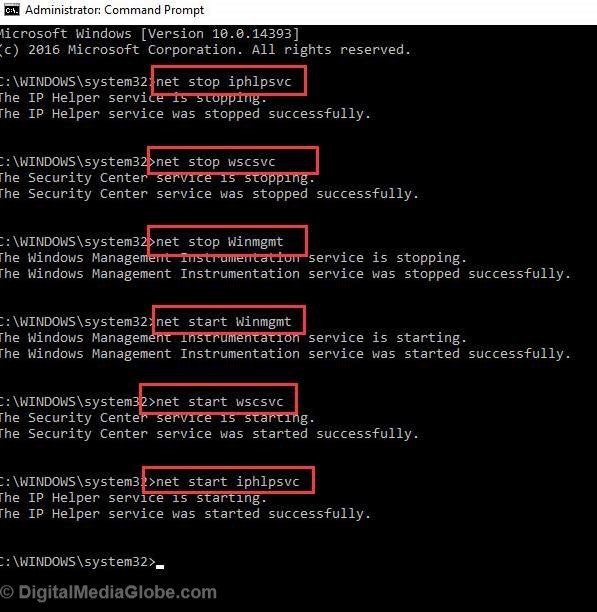
Here, we are stopping the WMI Provider Host associated services and then restarting it.
After you have completed the whole process, you need to restart the computer to affect it.
Now, check-in Taskbar whether WMI Provider Host still using so much CPU, memory, and disk usage.
If yes, then you need to look for Components and Drivers that are causing the problem.
Fix 2: Identify Components and Drivers Using Event Viewer
To identify a specific process that causes WMI Provider Host to use more resources of your computer, we need to view events currently running in Event Viewer of Windows 10.
Follow the steps below to look for errors that are causing the problem.
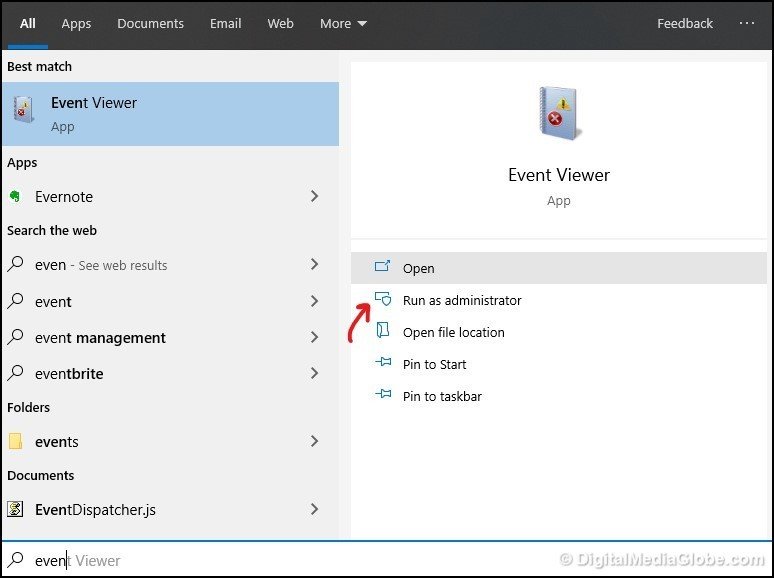
Steps 1: Click on Start and type in “eventvwr.msc.” Then, click on “Run as Administrator” to start Event Viewer.
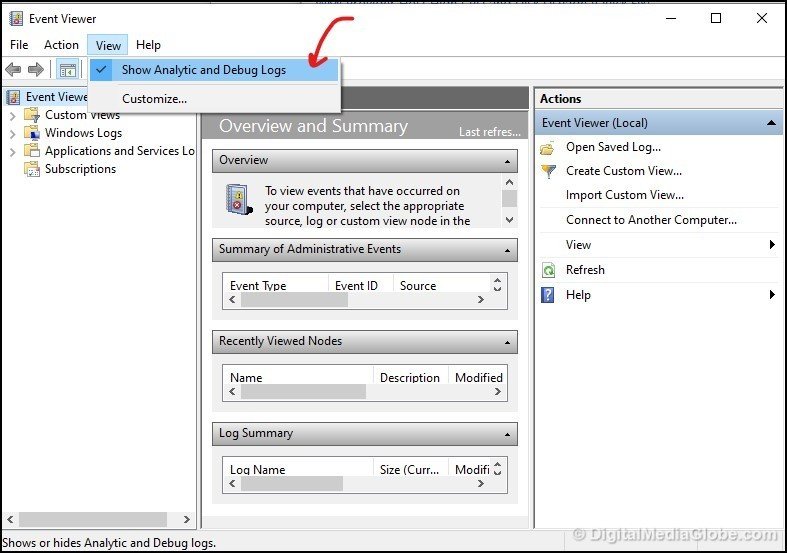
Step 2: In an Event Viewer window, click on the View tab and then click on “Show Analytic and Debug Logs.”
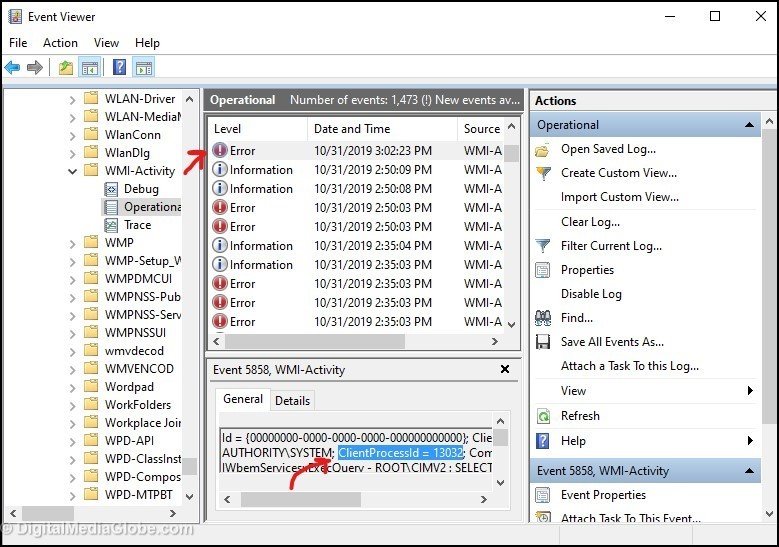
Step 3: On the left pane, you have to follow the path: Applications and Service Logs > Microsoft > Windows > WMI Activity > Operational. Here, you have to look for Error and also note down “ClientProcessID,” also known as PID
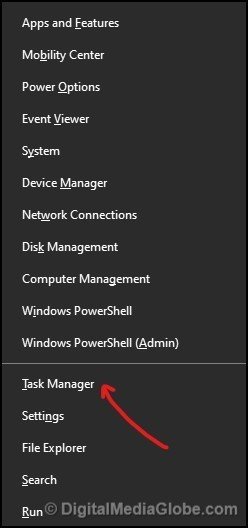
Step 4: Now, you have to open Taskbar in Windows 10. The quick way to open Taskbar is by pressing Windows Key + X. It will open side pane, look for Taskbar and click on it.
Step 5: Next, you need to click on the Services tab and then click on PID to arrange it in increasing or decreasing order. Now, search for noted “ClientProcessID” in Taskbar.
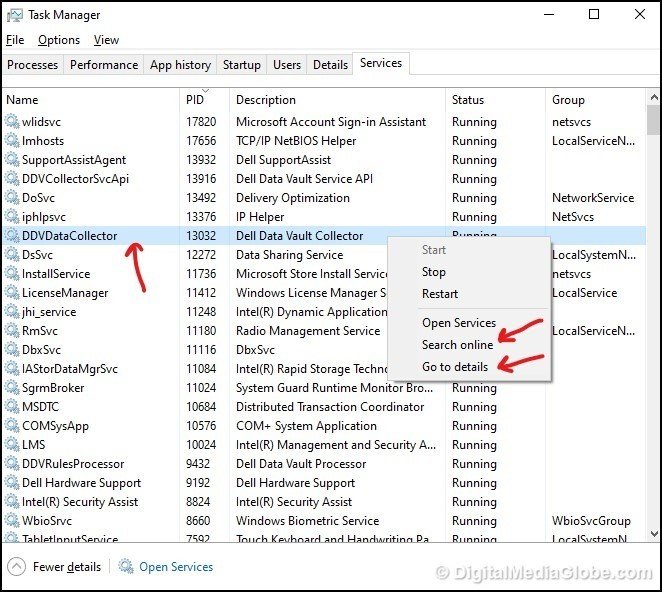
We have found that it belongs to “DDVDataCollector.exe” that is using so much memory and CPU.
You can right-click and look for more details of the services by clicking on “Go to Details.”
You can even click on “Search Online” to find out which part of the software it is belonging.
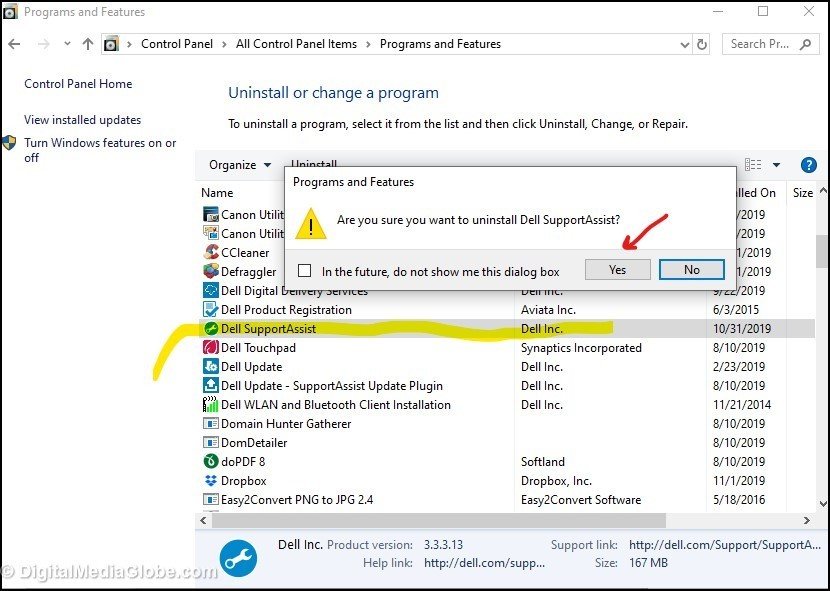
In my case, when I have searched online, I found that “Dell Data Vault Collector” is a part of “Dell SupportAssistAgent,” which is creating so many errors in Event Viewer.

Now, you have two choices; either you can update or repair the software or uninstall the software.
Step 6: If you want to uninstall, then open Control Panel (Click Start and type in Control Panel) and next look for “Program and Features.”
In Program and Features, search for a program that you want to uninstall and double click to uninstall it.
If you want to keep the software, then go to the program to update the software to the latest version.
Likewise, you have to look for other Errors in Step 3 and proceed further to solve it.
You need to restart Windows to see the changes you had made.
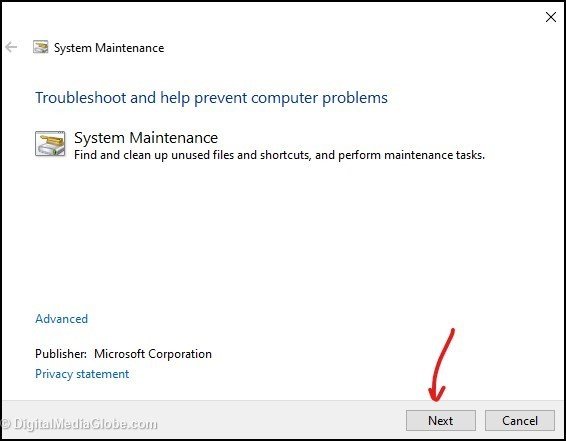
Fix 3: Using System Maintenance Troubleshooter
Sometimes, using System Maintenance Troubleshooter solves some of the minor problems which are otherwise unable to be noticed.
For this, you need to follow the steps below.
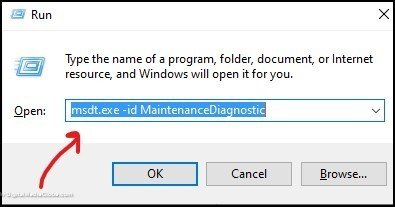
Step 1: Press Windows Key + R and type in “msdt.exe -id MaintenanceDiagnostic.” It will open the System Maintenance Troubleshoot window.
Step 2: In System Maintenance, click “Next,” and then it may ask, “Issues might be found troubleshooting with administrator permissions.” Go for it and click on “Try troubleshooting as an administrator.”
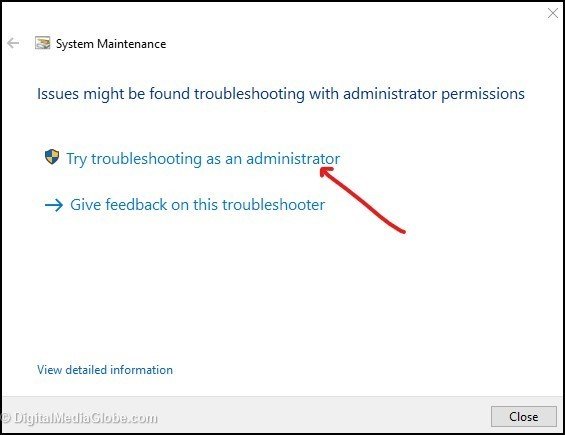
You have to check whether it helps. If not, follow another process.
Step 3: Again, Press Windows Key + R and type in “msdt.exe /id PerformanceDiagnostic.”
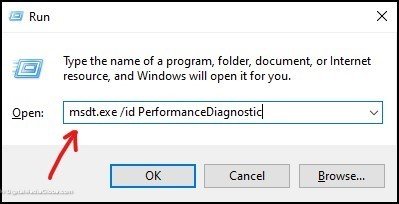
You need to follow the screen instruction to diagnose it.
This troubleshooting method improves Operating System performance, speed, and also it will adjust settings to an optimal level.
Sometimes you will get a message “Windows Online Troubleshooting Service is Disabled.” Here, you need to enable it before you perform any Performance Diagnostic.
Step 4: In the next level, you have to boot the system in Safe Mode with Networking to identify whether it is working fine in Safe Mode.
Boot the System in Safe Mode with Networking
Step 4.1: Press Windows key + R and type in MSConfig and click OK.

Step 4.2: Open window, click on the Boot tab and then check “Safe boot” and select “Network.” Click on “Apply” and then OK.
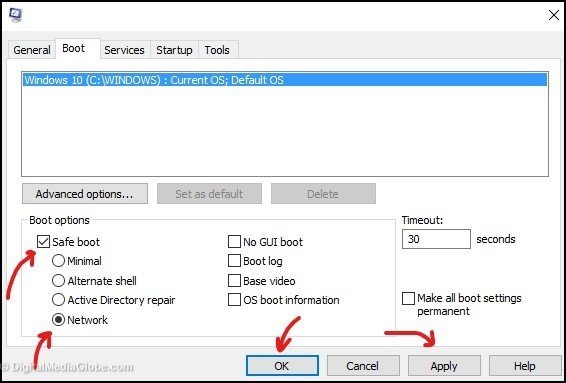
You need to restart the computer to check whether everything is working fine in Safe Mode. If it is working fine, then Boot in Clean Boot Mode.
Boot in Clean Boot State
Step 4.3: In a Clean Boot State, again, you have to open “MSConfig” using RUN and then in an open window, click on the “General” tab. Look for “Selective startup” and check only “Load system services” and click “Apply.”
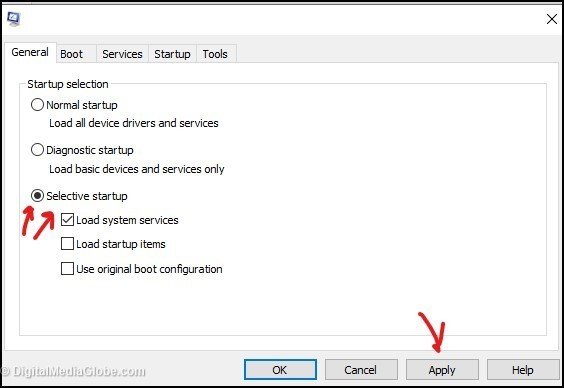
Step 4.4: Again, move to the “Services” tab, click on “Hide all Microsoft services” and then click on “Disable all.” You have to “Apply” the changes and click OK.
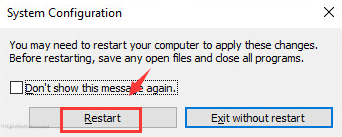
Restart the computer and diagnose it using the above process (which we have done earlier). It is an excellent way to identify any application or program that is creating a problem.
Once you have isolated the offending process manually, you can now either remove the program, repair the program, or update it to make the changes.
After you have done as instructed above, you can restart the computer.
Now, again open “MSConfig” and undo the changes you have done earlier.
Like, go to the General tab and check “Load startup items,” in a Boot tab, uncheck “Safe boot,” and in “Services” tab uncheck “Hide all Microsoft services” and “Enable all.”
You have to “Apply” all these changes and click OK.
Can I stop WMI Provider Host?
Technically, it is possible to disable WMI Provider Host, but it is not recommendable.
Whenever you try to disable Windows Management Instrumentation Service, it will pop up a message showing, “If this service is stopped, most Windows-based software will not function properly.”
It means that when you stop WMI Provider Host, it will break the application and will cause performance issues in Windows 10.
It is advisable not to disable this service.
Moreover, it is far better to identify the process that is eating up your CPU and memory; accordingly, repair, update, or disable that program.
I hope the above guide and fixes help you deal with WMI Provider Host and restore the performance and speed of the system.