FTC disclaimer: This post contains affiliate links and I will be compensated if you make a purchase after clicking on my link.
You have not probably heard of complete set of screen capture tool for Windows earlier.
But, with Windows 10 October 2018 update, Microsoft has launched Snip & Sketch app – a Windows 10 Screenshot App.
This tool has clearly changed the way we take screenshot on Windows 10.
It is found to be more quick and straight tool of Windows 10.
In this article, we will go through each and every features of Snip & Sketch so that you can take maximum benefits out of it.
Before we dive into Snip & Sketch app, it is good to be familiar with some core points about the tool first.
What is Snip and Sketch?
Snip & Sketch app, a Windows 10 screenshot app is a complete replacement of Snipping tool with the combination of Screen sketch (previously part of Windows Ink Workspace)
With Windows 10 Snip & Sketch tool you can create screenshots easily and then annotate it. Later on, if you want you can save it on screenshot folder or directly share it in social media.
Moreover, it will boost your productivity the way you can take screenshot in Windows 10.
How do I open snip and sketch?
There are many ways to open Snip & Sketch – screenshot app for Windows 10.
But, before that you should know that where could I find Snip & Sketch app.
Like other apps, Snip & Sketch app is also available in Microsoft store.
So, when you have updated Windows 10 to version 1809, it will be automatically available and will come installed.
How to check Windows version?
For this, Press Windows key and R (in keyboard). A Run Windows will pop up, type in “winver”. A new Windows with Windows version will pop-up.
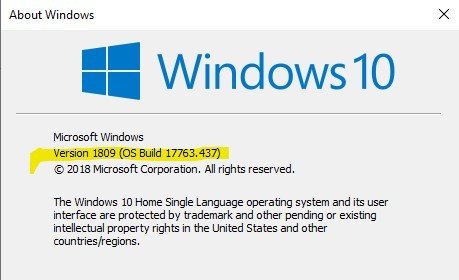
You can also open by just clicking on Start and then type in “winver“. Click on it and it will open in the same Windows.
Lets look into the method to open Snip & Sketch.
Method 1: Type in Snip & Sketch
This is one of the basic way to open any app in Windows 10. Just click on Start and type in “Snip & Sketch”
On clicking, it will open the apps.
Method 2: Snip and Sketch keyboard shortcut
Quickly, you can open Snip & Sketch through keyword shortcut.
Just press Windows key + Shift + S simultaneously.
It will appear with dim screen and a small toolbar at the top of the display.
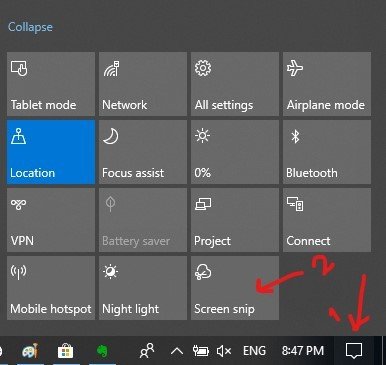
Method 3: Screen Snip in Action center
You can directly get access to Snip & Sketch on clicking the quick action button labelled as “Screen Snip” in Action Center of Windows 10.
It can automatically appear with upgrade of Windows 10. Still, if you have an issue, you can enable it by visiting “Notification & Actions Setting“.
You can open “Notification & Actions Setting” by clicking on Start and then start typing “Notification & Actions Setting“. You will see it is under System Setting.
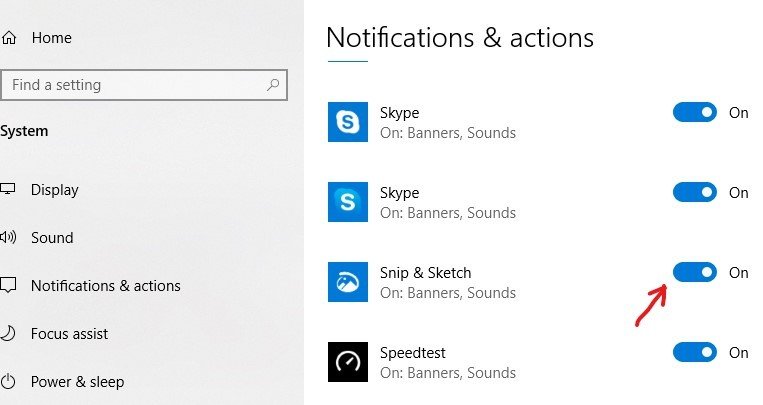
You need to confirm that it is enabled
Method 4: Using Print Screen (PrtScn) as shortcut key to launch Snip & Sketch
Yes! It is now possible to have a shortcut key for Snip & Sketch.
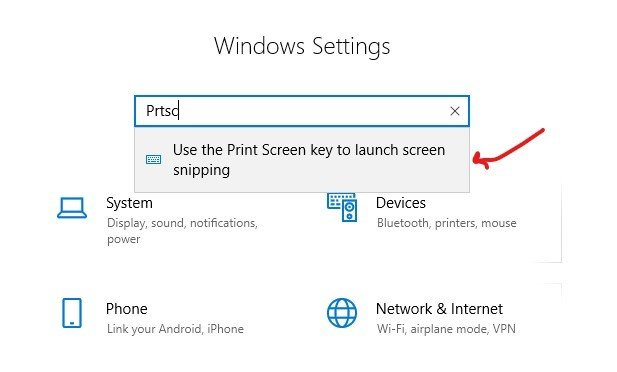
For this process, Click on Start and type in Settings. A Windows Settings will appear. Here, you need to type in “PrtScn“.
As you can see in below illustration, search appear as “Use the Print Screen key to launch screen snipping“. Simply click on it
Another screen will appear, which says toggle ON to “Use the PrtScn button to open screen snipping” under “Print Screen shortcut“.
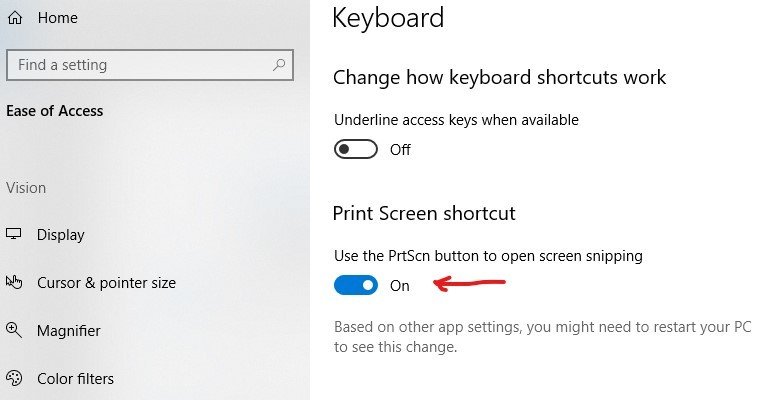
Now, you can use “PrtScn” as shortcut key to launch Snip & Sketch.
Overall, we have seen four method just to open Snip & Sketch.
In the next step we will see to how to use Snip & Sketch correctly.
How do I use the Snip & Sketch in Windows 10 to take screenshot?
Once you have launched Snip & Sketch, a dim screen will appear with a toolbar at the top.
It has three icon:
Rectanglur clip icon: Click on rectangle icon and draw a rectangle by holding a left mouse button and dragging it. It will capture the highlighted part.
Freeform clip icon: Click on Freeform icon to give any shape to your capture.

Fullscreen clip icon: Lastly, the Fullscreen clip icon will capture entire screen.
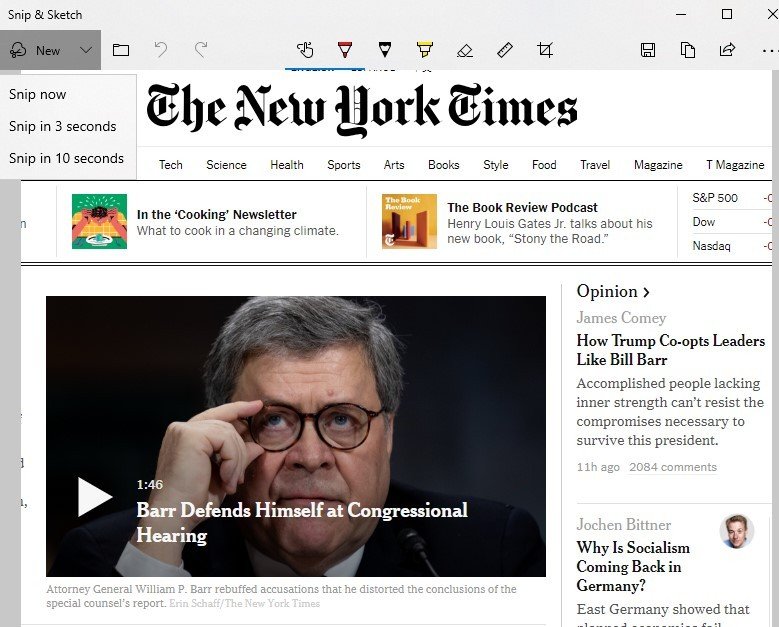
After you have captured a screen (by using any of the above icon), it will go straight to your clipboard. Just see below illustration.

From above illustration it is clear that immediately after taking screenshot, you will get an invitation to take your snip to the Snip & Sketch tool.
Here, you can annotate the screenshot and share it.
When you look over the Menu option from extreme left, you find “New” button. Further, in a drop down menu “New” has another three option: Snip Now, Snip in 3 Seconds, Snip in 10 Seconds
With the above option, you can take another snip immediately or in delayed time.
Next is the “Open File” menu to open any previous file or the file you want to edit it in Snip & Sketch.
How to edit screenshots with Snip & Sketch?
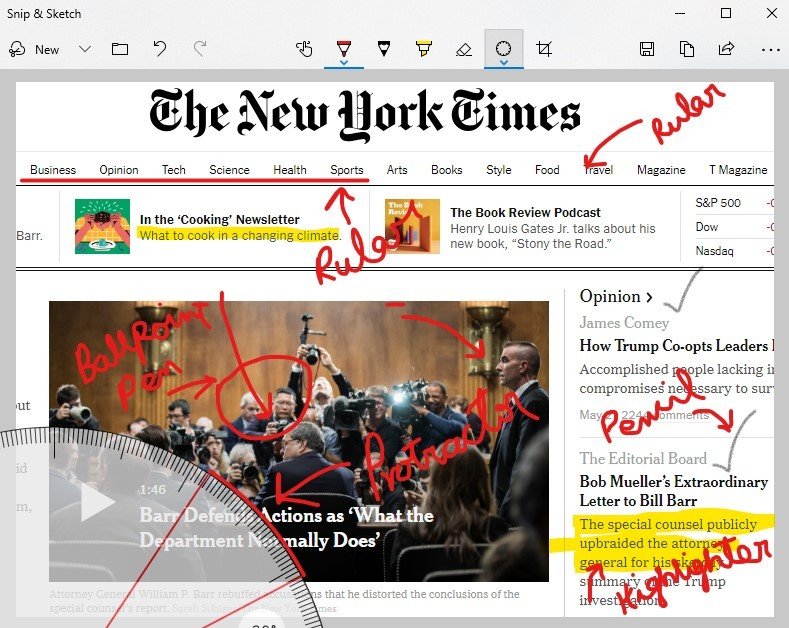
To edit in Snip & Sketch, it has been provided with multiple annotate tool in middle-top.
Middle-Top tools:
It includes Touch Writing, Ballpoint pen, Pencil, Highlighter, Ruler/Protractor and Crop tool.
Except Touch Writing and Crop tools, you can find other option in a drop down menu like colors and size.
You can use different tools to mark, highlight, underline and to explain it.
Top-right tools:
On your top-right, you will see three more options like save, copy and share.
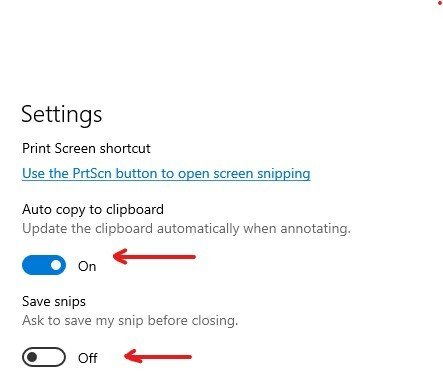
Furthermore, clicking on three dots, you have other options like Open with, print, Send feedback, Settings and Tips & Tricks.
When you will click on “Settings“, you will find other options like Print Screen shortcut (which we have discussed above), Auto copy to clipboard (by default it is on), Save Snips (to save any snip before closing).
I prefer to toggle ON “Save Snips“, to save it, if you accidentally close the Windows.
Wrap Up:
Hope, the above illustration gave you hand-on experience on Snip & Sketch tool and know the inside-out of its workings.
Currently, Snip & Sketch tool is considered to be the best screenshot app for Windows 10.
In case of any queries or doubts regarding the tools, feel free to comment below.