FTC disclaimer: This post contains affiliate links and I will be compensated if you make a purchase after clicking on my link.
Have you ever wondered what is static IP address and why you need it for your device?
Using your router is one of the easy ways to assign a static IP address to any device.
The most important benefit you get by setting up a static IP address to the router is your control over the device.
If you don’t assign a static IP address to a router, then the router will automatically assign an IP address from the IP address pool.
The router uses a DHCP protocol (Dynamic Host Control Protocol), whose work is to assign a new IP address randomly to the newly connected device.
A device can have one IP address for a certain period of time, called lease time. After that, it will get assigned with the new IP address.
This type of IP address, to which your DHCP is generally assigned, is known as an Internal IP address. The internal IP address has scope within a network, and it cannot route traffic outside the network.
The IP address that routes your traffic outside your home or local network is known as a Public address.
For better understanding, you can follow the guide on Internal IP address or Public IP address.
The IP address, whether it is public or private, can be of two types: Static IP address and Dynamic IP address.
Static vs. Dynamic IP address
The static IP address doesn’t change automatically with time, and one has full control over the static IP address. The static IP address lease time can be manually configured as per the requirement.
On the other hand, the Dynamic IP address changes automatically after a certain period of time. It is assigned by your network router automatically using a protocol called DHCP.
When to use a Static IP address?
The static IP address is mostly used in the more advanced applications. The application includes a peer to peer file sharing, UltraVNC (to connect your desktop or laptop remotely), and much more.
The static IP address is also helpful when you are backing up files remotely to a network storage device.
Let’s look into how to set up and configure a static IP address to a router.
How to assign a static IP address to a router?
It is one of the most preferred methods because it doesn’t require manual configuration and setup of the static IP address on each device in the network.
Most of the devices don’t have an interface through which you can setup a static IP address. For instance, Wireless Printer, PS4, Camera, Raspberry Pi, NAS (Network-attached storage), etc.
Setting up a static IP address to all these devices through a router would be a more convenient way.
It would help if you had a certain thing before you setup static IP address like:
- web portal address of the router
- Username and password to access the portal
Mostly the web portal address, username, and password are just behind the router. If it is not printed, then the web portal address would be the “default gateway” of your network.
Find out the Default Gateway address.
You can easily get your default gateway by using the following command in your command prompt.
ipconfig | findstr "Default Gateway"
First of all, you need to open your command prompt and type in the above command, and note down the default gateway address.
Look for the Username and password of a router.
Next, you need to look for a username and password, mostly the default depending upon the service provider or brand. You can easily search for it using the service provider name as a keyword.
If the above trick doesn’t help, try with the most common username like “admin” and password as a “MAC address.”
Open router UI portal
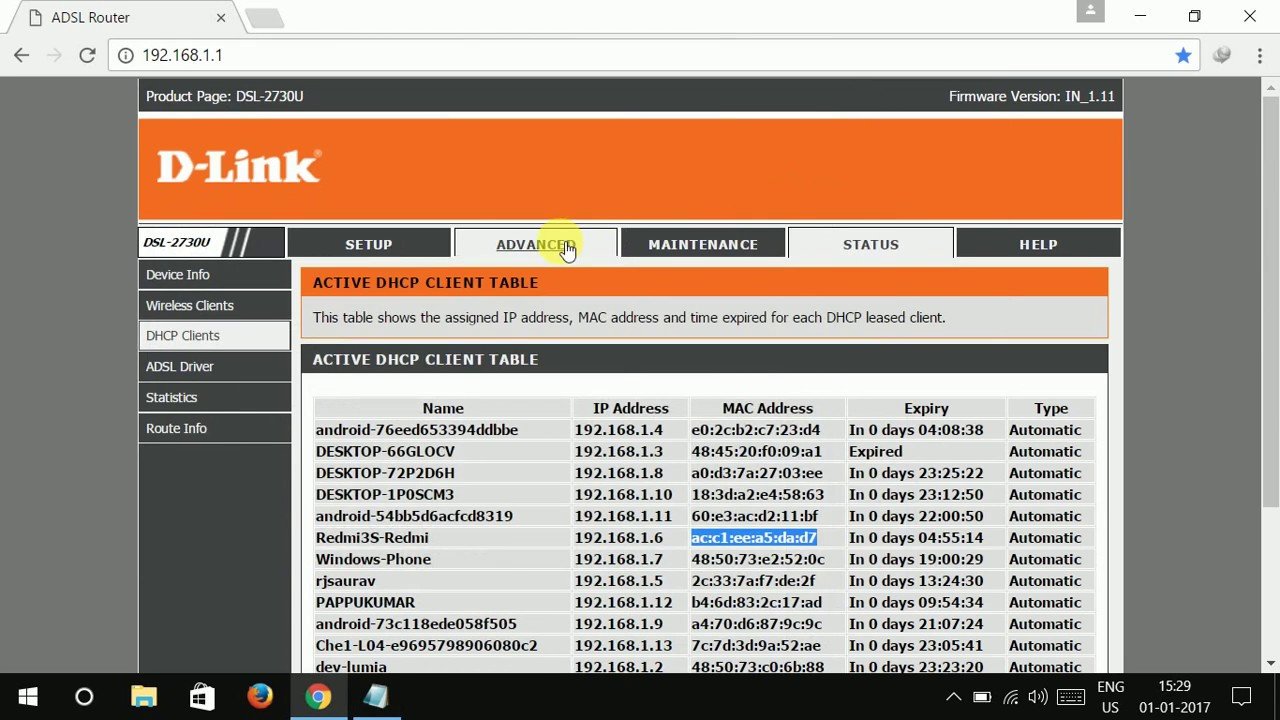
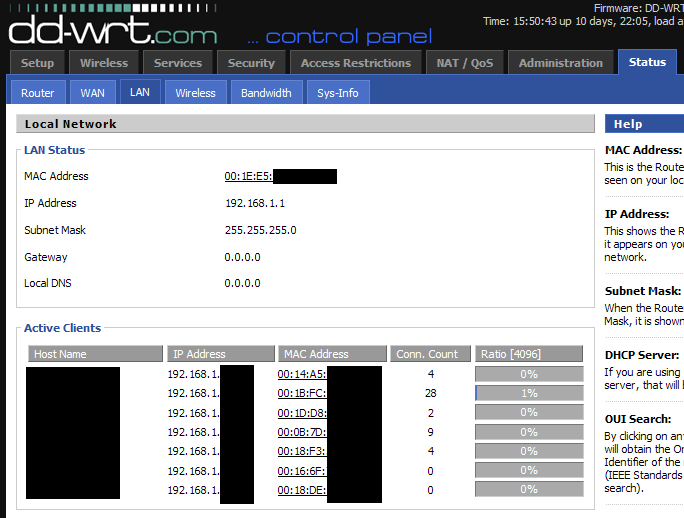
Now, open the portal using the login credential and look for the “DHCP server” client list. The router interface structure is mostly the same in most brands, service providers, or software.
The “DHCP server” generally present under LAN, which would be most probably on the network interface.
Here, we have depicted the interface for DD-WRT router software and the D-Link brand.
From the above screenshot, you have to note down the MAC address and hostname, which we will use to bind with the static IP address.
The available IP address range is from 192.168.1.1 to 192.168.1.254, whereas the first and last IP address is excluded from the range that is 192.168.1.0 and 192.168.1.255.
Now, you have to look for the IP address not occupied in the above DHCP client list.
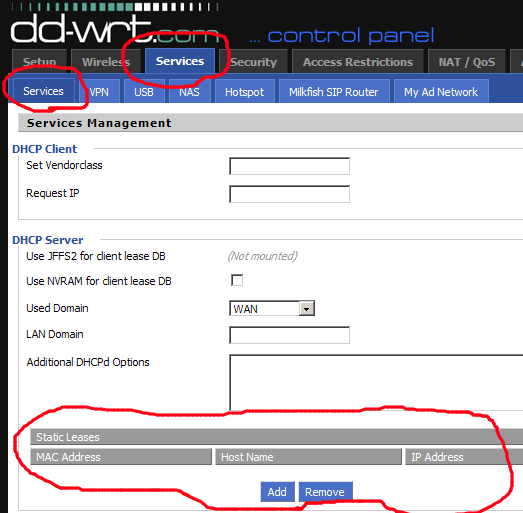
After having all three, that is, MAC address, hostname, and IP address (of your choice), you have to look for DHCP binding service, which would be on the same section.
Binding MAC and IP address
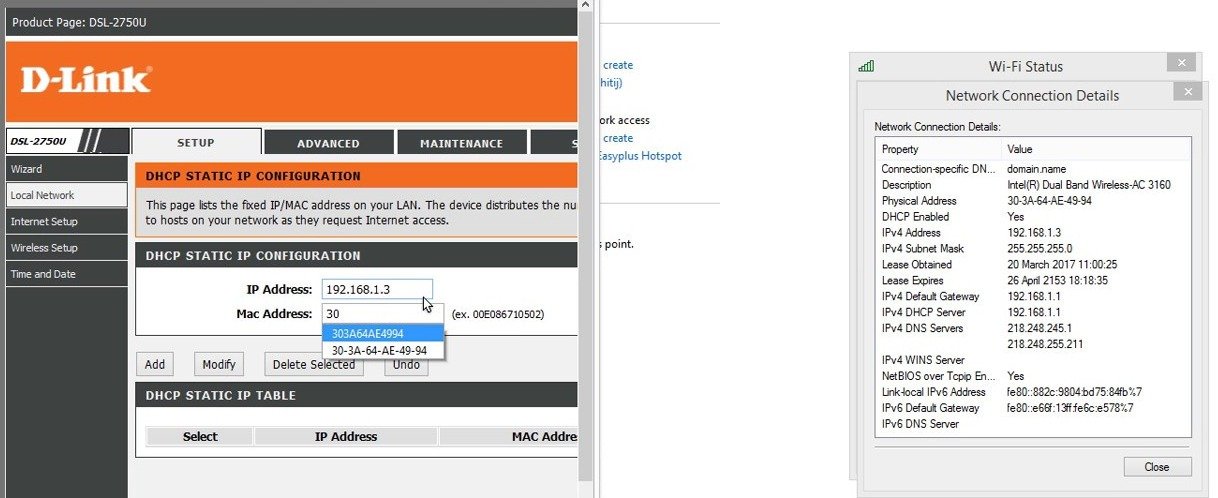
The binding section name may vary, such as DHCP static IP binding, DHCP binding, IP MAC binding, and so on.
Here, you have to add a new entry, which includes MAC address, hostname, IP address, and lease time (in minutes), and save the changes. For illustration, you can look at the below screenshot.
After configuration, you can check the status by running the below command in the command prompt.
IPconfig/all
If you are connected with wi-fi, look for the detail in the wireless “LAN adapter wi-fi” section.
If you would like to change from static to dynamic, then remove the above entry, and you are done.


