FTC disclaimer: This post contains affiliate links and I will be compensated if you make a purchase after clicking on my link.
If you have too many devices in your home network and most of the devices are too far from the router, you may face difficulty connecting wirelessly.
The presence of a second router may increase network signal and accommodate a large number of devices.
Here, we will look into how two routers using the same internet connection and modem can help you connect multiple devices.
Moreover, we will also look at how two routers enhance the wireless signal so that they can cover your whole home network.
Can You Have Two Routers on the Same Network?
You can set up two routers on the same network using one internet connection and one modem.
The second router act as a range extender. You have to configure a second router to share the same SSID (Service Set Identifier).
It means that you can connect with any of the two routers, whichever router provides a better signal.
Benefits of having two routers on the same network
When you set up two routers on the same network using one internet connection and one modem, you will likely have many benefits.
The most common benefits are:
Support more wired devices on the same network
Routers have a limited number of LAN ports. A single router will allow almost five wired devices to connect with it.
So, you will have more Ethernet ports available for more devices when you add another router. It is also a good replacement for a network switch.
Provide an opportunity for both wired and wireless network setups
It is helpful when you have one wired router that can connect only wired devices.
In such a case, you can have one wireless router that can support your wireless devices.
Conversely, when you have a wireless router and want to connect more wired devices, installing another wired router would help.
Extend your wireless signal
Having another wireless router will definitely extend your existing wireless signal.
It will give you opportunities to have more devices and have the wireless signal to a longer distance.
Device and network isolation
Network isolation is required when one device utilizes the network to transfer large files consistently, playing video games or streaming videos.
This way, it may affect network traffic for other devices on the same network.
This technique would be helpful to isolate certain devices, who are heavily using the network traffic.
Act as a backup router
In case of one failed router, another router will act as a backup router.
How to connect two routers on the same network?
It is now clear that for what purpose you want to set up a second router. You also have the choice to set up a router, either wired or wirelessly.
Method 1: Connect two routers with Ethernet wire
When two routers are connected, this type of connection is called “Cascading.”
There are two ways to connect two routers in one network using an Ethernet cable.
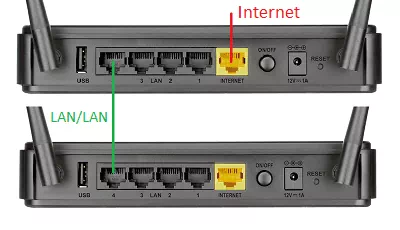
LAN to LAN Connection
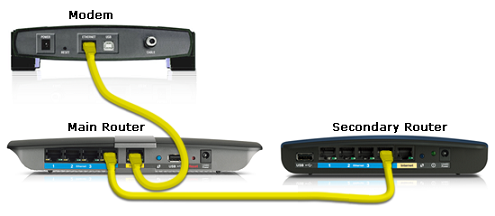
You can build-up LAN to LAN network when you connect the LAN port of the main router with the LAN port of the secondary router using an Ethernet cable.
This type of connection will extend your existing network connection. and SSID (Service Set Identifier).
Moreover, this type of connection requires the main or primary router and secondary router to be on the same LAN IP segment.
Additionally, it would help if you disabled the secondary router’s DHCP server.
As a result, it allows any of the devices in a network to get connected with any of the two routers.
Also, this configuration will allow you to share files and resources within the network.
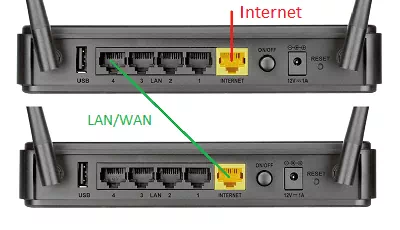
LAN to WAN Connection
You can build-up LAN to WAN network when you connect the LAN port of the main router with the WAN port of the secondary router using an Ethernet cable.
This type of connection will create a second network, helping to isolate certain devices or networks.
Moreover, this type of connection requires the two routers (both main and secondary routers) on different IP segments.
Thus, it will let your devices identify which routers you are connected with.
However, in this way, it won’t let you connect with other devices if the device falls into another network.
In other words, if your device, like the computer, is connected to the main router, then it won’t be able to communicate with the secondary router or vice-versa.
It is because both the routers will create two different networks.
Method 2: Connect two routers wirelessly
When two routers are connected wirelessly, then this type of connection is called “Bridging.”
Moreover, bridging is supported by the only selected router models.
How to Setup two router on the same internet connection
Initial Setup of two router
The two routers should be divided as below:
- Primary router or main router, which is connected to the internet via modem
- Secondary router, which is used as an extender or creating a separate network.
You have to decide which router you want to keep, the primary or main router, in both choices.
Mostly, a new router is preferable to keep it as the primary or main router because it can have more features and upgraded technology.
But, if you have both the same router, you can choose any of them for the primary router.
Also, the main router should have an active internet connection before you connect the second router.
If you face any difficulty while connecting to the internet directly from your modem, you need to contact your Internet Service Providers (ISPs).
Method 1(a): Setup and Connect two router with Ethernet wire
Here, we have taken an example of a TP-Link router.
LAN to LAN Router Setup
Connect two routers with Ethernet wire
Before setting up, you need to make sure that the main router is connected to the internet via modem.
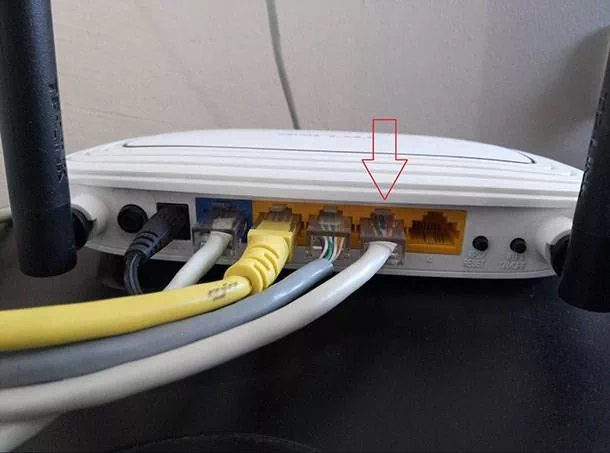
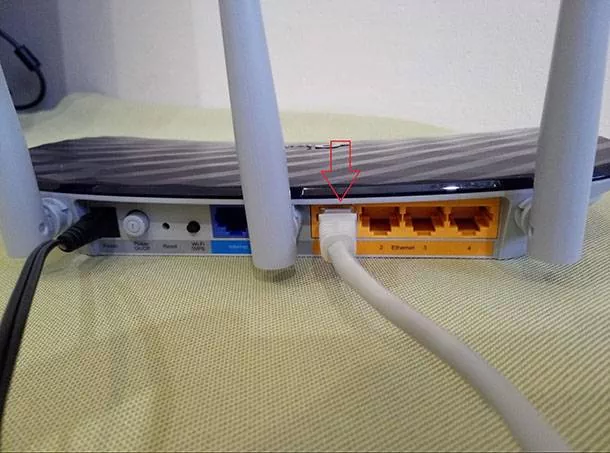
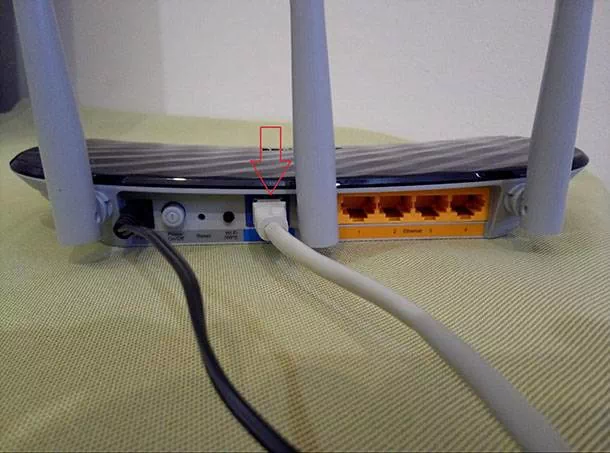
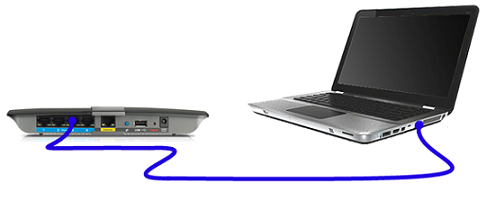
Now, taking the Ethernet wire’s help, you have to connect one end of the Ethernet to the main router.
Take the other end of the Ethernet wire and connect it to the secondary router Ethernet port.
Configuring DHCP server in both routers
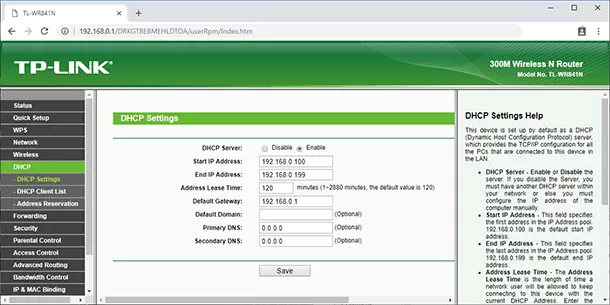
You need to check whether the DHCP server is enabled in the main router. By default, it is enabled in the router.
For this, you have to connect your computer with the router using Ethernet wire and then log in to the router’s web-based interface.
After that, you need to look for DHCP/DHCP setting in the router. If the DHCP server is disabled, you can enable it and save the changes.
Now, you have to connect your computer with the secondary router to configure the DHCP server.
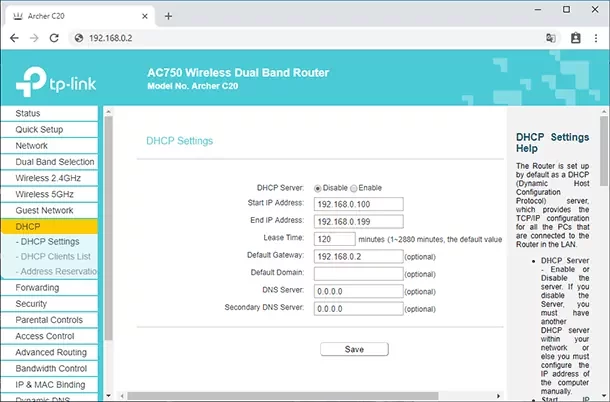
We don’t need a DHCP server in the secondary router because it will receive addresses from the main router.
So, we will disable the DHCP server by going to the DHCP / DHCP settings.
Changing IP address in the Secondary Router
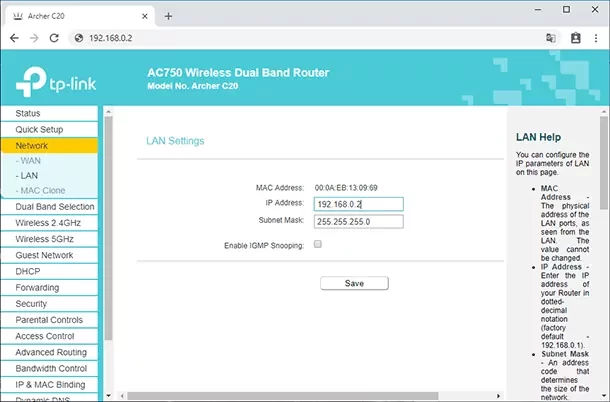
You have to change the secondary router’s IP address because it should not coincide with the main router.
If your main router IP address is 192:168:0:1, then change to 192:168:0:2.
You have to change the last octet of the IP address.
Lastly, reboot the secondary router, and you will find that both the router is connected and working in the same network.
The main router will act as an access point and the secondary router as an extender.
LAN to WAN Router Setup
Connect two routers with Ethernet cable
In the LAN to WAN connection, you can connect Ethernet wire one end to the main router Ethernet port.
The other end of the Ethernet cable should be connected to the router’s WAN or Internet port.
Configure DHCP server and IP address range in both routers
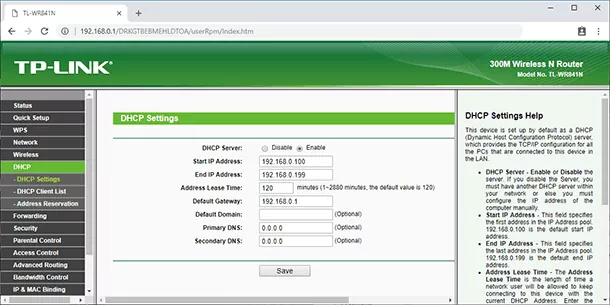
You need to confirm that the main router DHCP server is enabled; if not, enable it.
Also, note down the IP address range. Here, we have set up an IP address range from 192.168.0.100 to 192.168.0.199.
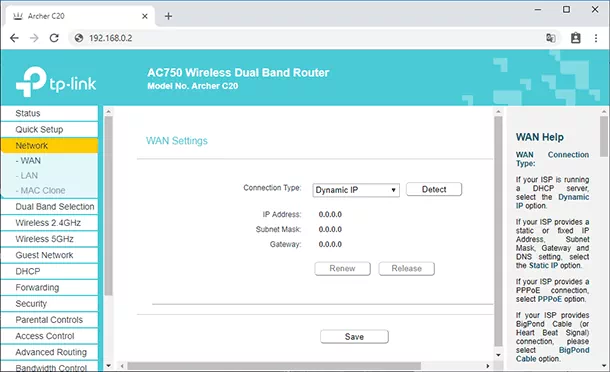
Now, you have to move to the secondary router and look for “Network” and then “WAN.” Here, you have to change the “Connection Type” as Dynamic IP and then save the changes.
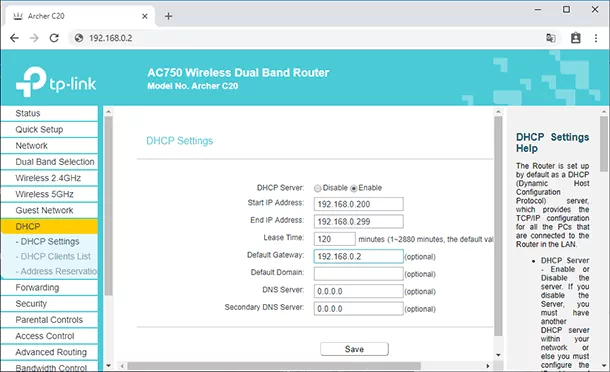
Next, look for the DHCP section and “enable” the DHCP server.
Moreover, if you like to use the LAN port of the secondary router, then you have to set up a different IP address range compared to the main router.
Because it will conflict with the IP address of the main router.
Here, we have set up the IP address range from 192.168.0.200 to 192.168.0.299 and then save the changes.
After that, there would be a separate access point for each router
Method 1(b): Setup and Connect two router with Ethernet wire
This method is applied to the smart Linksys router. Moreover, this is when two routers are connected through an ethernet cable, which also terms as Cascading.
Connecting one router to another router (LAN to LAN)
Setting up devices
Step 1: Note the IP address of the Main router or primary router
You need first to note down the IP address of the main router.
For detailed instructions on how to check the IP address of the computer, you can click here.
Step 2: You need to connect your device or computer to one of the secondary router’s ethernet ports.
Access router web-based interface
Step 3: Access the web-based user interface of the secondary router.
To access the web-based user interface, you need first to launch a web browser and enter the IP address “192.168.1.1“, most common for most routers.
If you don’t know the router IP address, you can click here for the gateway address.
Once you have successfully launched the login screen, then enter the login credential.
The most common default username and password is “admin” and “password.”
If you are still unsure, then look for a router manual, or you can find it on the back of the router.
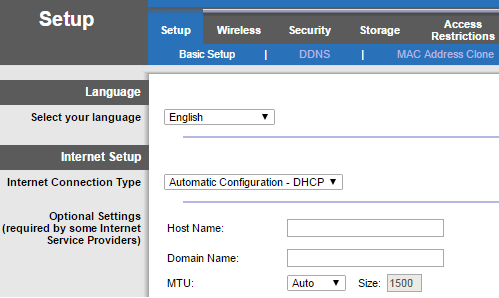
Here, we have taken the example of the Linksys router. So, after successfully logging in to the web interface, you find the below screen.
Configuring secondary router
Step 4: Change the IP address of the secondary router.
Under basic setup, you have to look for “Network setup” and then look for “IP address” or “Local IP address” in “Router IP address.”
If the main router IP address is 192.168.1.1, you can set the Secondary router IP address like 192.168.1.2.
It means you have to change the last octet of the IP address from 1 to 2.
Step 5: Change the DHCP server setting of the secondary router.
Now, under “DHCP server setting,” you have to set the DHCP Server to Disabled.
You have to save the settings and exit from the router web interface.
Connect two routers using an ethernet cable
Step 5: Connect the secondary router to the main router.
After setting up the secondary router, you need to unplug it from the computer and put it in the main router’s ethernet ports.
Moreover, it would be best if you verified that the main router is connected with a modem or not.
Connecting one router to another router (LAN-WAN)
Initial setup process
Step 1: You need to note down the main router’s IP address as you have done in the LAN to LAN case.
Step 2: Connect your computer with the secondary router using ethernet ports and then access the secondary router’s web-based interface.
Configuring secondary router
Step 3: Look for the “Basic Setup” sub-tab and then look for IP address or Local IP address.
Here, you have to change the IP address’s third octet and make sure the subnet mask is 255.255.255.0.
The main router IP address is 192.168.1.1, then the secondary router IP address should be 192.168.2.1.
Step 4: Now, keep the DHCP server enabled in the secondary router. If it is not enabled, move to the “Basic Setup” and click “Enabled” on the DHCP server setting section.
In last, save the settings and unplug the cable from your computer.
Step 5: The one end of the ethernet cable should be connected to the main router’s ethernet port.
Further, the other end of the Ethernet cable connected to the secondary router Ethernet port should be transferred to the Internet port.
Additional Setting for Wireless router
When the two routers, which we will connect, are wireless routers and want the wireless devices to connect with the router, follow the below steps.
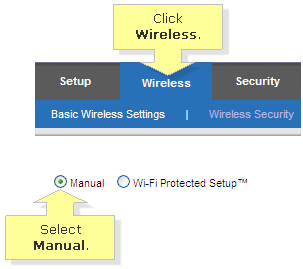
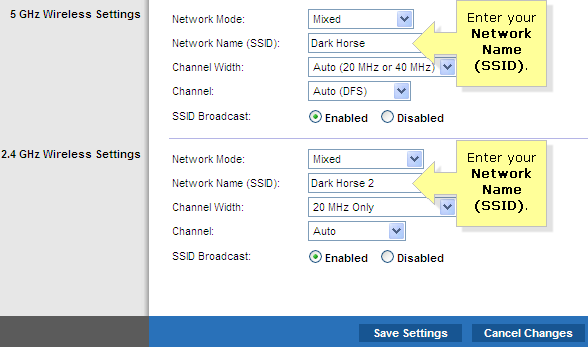
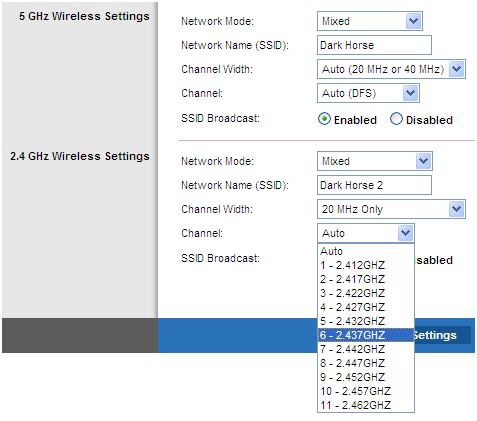
Step 1: You have to go to the wireless tab and then select Manual. Now, enter your own SSID (Network Name) in the field, which is used to recognize the device.
As we have taken the example of dual-band Wireless-N router (5 GHz and 2.4 GHz frequency), we need to follow the below settings.
Moreover, you can also see that SSID Broadcast is enabled by default.
Step 2: Now, you have to set the “Channel Width” of the router. If there are multiple 2.4 GHz, wireless networks then set the Channel Width as 20 MHz.
Next, you have to select the non-overlapping channels, which are recommended as 1,6, and 11. If you are experiencing any connection issues, then set it as Auto. After setting up, click save settings
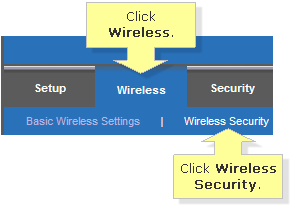
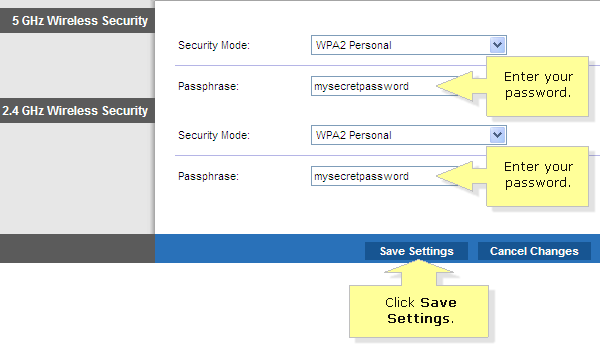
Step 3: Lastly, set the Wireless network password (Passphrase or security key). For this, you have to select the “Wireless Security” sub-tab in the “Wireless” tab.
You have to select the security mode in the drop-down menu. It is recommended to choose WPA2 Personal for better security.
Next, enter the Wireless network password or passphrase and then save the settings.
Method 2: Setup and Connect two routers wirelessly using WDS
Setting up the main router
Before connecting two routers wirelessly, it is good to confirm that the main router to an internet connection via modem.
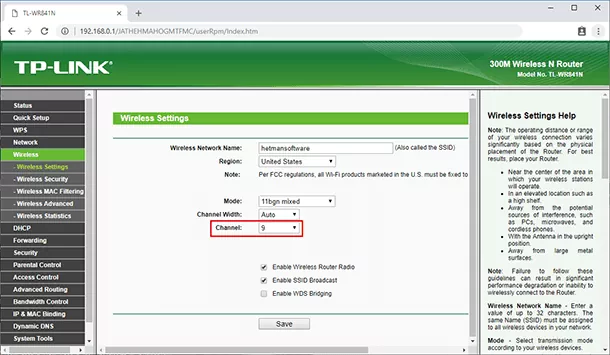
Also, you need to set up the channel of the main router static instead of automatic.
You have to Wireless tab (here, we are using TP-Link as an example) and then select the Channel field. You can choose 1 or 9 and save the settings.
Setting up secondary router IP address
Firstly, you need to change the IP address of the secondary router. You cannot have the same IP address of both routers because it will conflict.
To launch for the first time, you have to default IP address 192.168.0.1. It could be different for different router models.
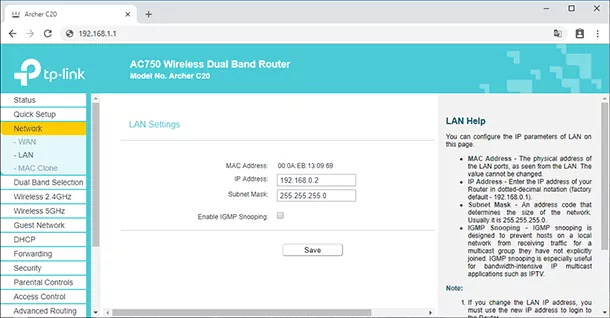
As we know that the main router IP address is 192.168.0.1. So, you can set the secondary router IP address as 192.168.0.2.
For this, you have to click on “Network” and then “LAN.” You have to select the field IP address and then change the last octet from 1 to 2.
Now, you can launch the secondary router with the new IP address (192.168.0.2).
Setting up secondary router network name and channel
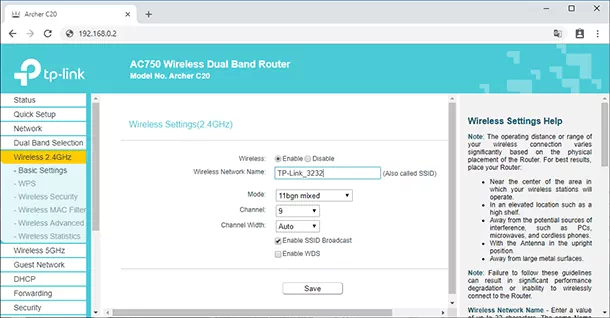
You can set up different Wireless Network Name (also called SSID) by going to the “Wireless” section and then “Basic Settings.”
Now, move to the channel section and set the same channel number you have set for the main router. In this case, the channel is 9.
Enable WDS in the secondary router
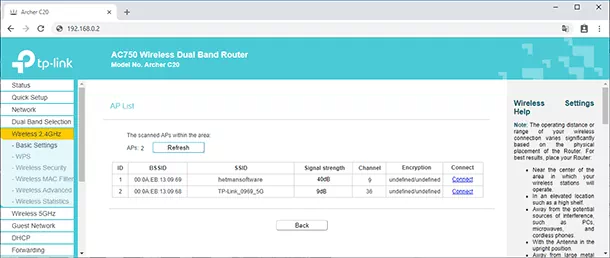
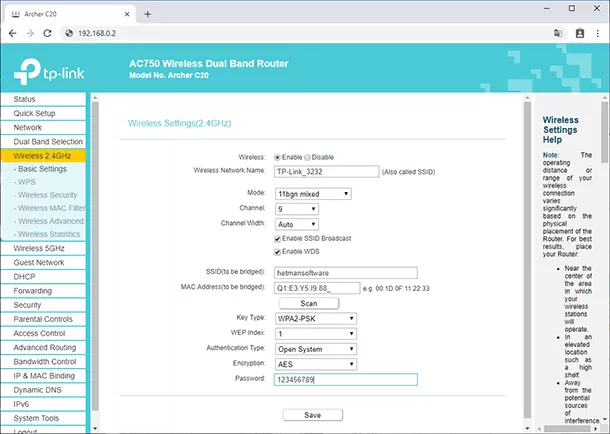
In the same “basic settings” under the “Wireless” section, you have to enable WDS and then click “SCAN.”
(Enable WDS in the secondary router)
After scanning, it will list down the AP (Access Point) list. You need to select the main router from the list and then click “Connect.”
Now, you can provide the password to the secondary router in the “Password” section.
Check secondary router is connected with the main router
After rebooting the secondary router, you have to check whether the secondary router is connected to the main router.
You have to go to the “Status” page and then look for the “Wireless” section.
If the “WDS Status” is showing “Enabled,” it is connected to the main router.
Disabling DHCP server in the secondary router
In the WDS mode, you can connect with the secondary router by Wi-Fi only.
If you want to connect to the secondary router with a cable, you have to disable the router’s DHCP server.
For this, you have to look for the “DHCP” menu and then “DHCP setting.” After that, choose “Disable” in the “DHCP server” section.
Lastly, place the secondary router in the right location within the effective range of the main router.
