FTC disclaimer: This post contains affiliate links and I will be compensated if you make a purchase after clicking on my link.
The setup and configuration of the wireless access point are not that different. During the setup process, you have to decide the place to keep the access point.
You also need to detect the dead spot where the wireless signals are not reachable and look for a nearby network jack and power outlet.
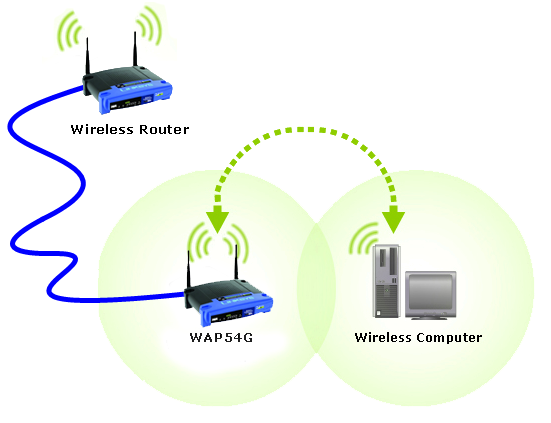
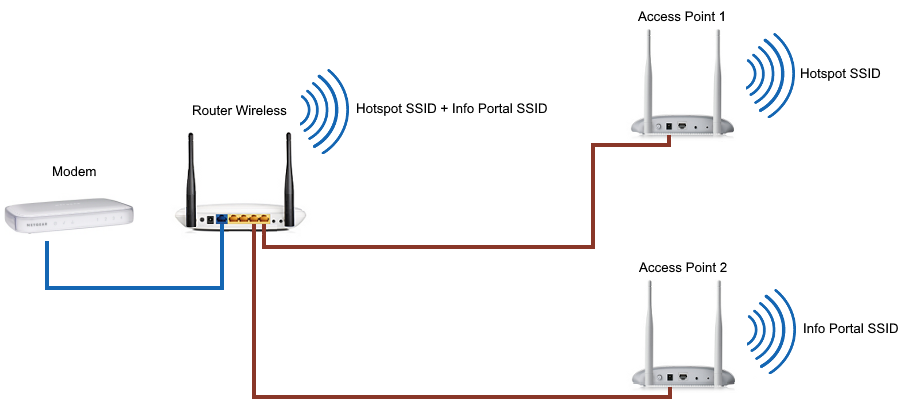
Next, you have to connect your access point to your gateway or router using a network cable.
After having the setup process, you need to configure the wireless access point.
To configure your access point, you have to know your access point IP address.
Moreover, you will also find a multifunction access point with separate DHCP and NAT services for the network.
Let’s look into the basic requirement to set up your access point.
The requirement to set up an access point
An access point – Wireless access point you can buy separately, or you can convert your router into an access point.
A switch or router – These network devices are useful in the distribution and management of traffic transferred to and from the access point in the LAN.
Ethernet cables – This is a network cable required to connect devices and transfer data among access points.
An AC/DC adapter – Some access points require a power adapter to function. But, most of the modern wireless access point comes with Power over Ethernet (PoE) functionality which eliminates the need of power adapter.
A computer is required for network configuration or to configure a basic (or advanced) access point.
Some other hardware or software items are also required, such as a modem, access point driver installation software, and other elements. Additionally, it will increase with the expansion of the network.
Deployment of router/switch
If you have not already installed the router or switch, you need to do it before setting up the access point.
Step 1: Look for the spot that can cover the maximum area with a Wi-Fi signal and has less interference.
Step 2: Connect the router to the power outlet and switch it on. If the device comes PoE compatible, then it doesn’t require an outlet – just an Ethernet cable.
Deployment of the access point
Step 1: A wireless access point can be placed in an area where the wireless signals are weak or dead spot.
Also, if the purpose of the wireless access point is to increase the wireless connectivity to the wired LAN, it should place in a location that has fewer obstacles and give the greatest coverage.
Step 2: If the wireless access point requires a power adapter, plug it into the external socket. But, if it is PoE (Power over Ethernet) compatible, it doesn’t require a power adapter.
Connect cables to establish a connection
Step 1: Use an Ethernet cable to connect to the Ethernet port of the access point, and other ends should be connected to the LAN port of the router.
Step 2: Use an Ethernet cable to connect to the LAN port of the router and the other end to the Ethernet port of the computer.
A computer will be part of the network and helps in the management of the access point and LAN.
Step 3: If you require internet access to your LAN, you need to have another Ethernet cable.
One end of the Ethernet cable will be connected to the router’s Ethernet port, and the other ends will be connected to the modem’s Ethernet port.
It would be best to switch on the modem by connecting it to the power supply using a power adapter.
Configuration of the wireless access point
The configuration of the wireless access point is related to the functionality of the device.
Most of the options you will find same in almost all the access point devices.
Enable/Disable Wireless access point
The device has an option to enable or disable the wireless access point function.
Wireless access point SSID
The Service Set Identifier (SSID) is used to identify the device in a network. Most of the wireless access points set up a default SSID.
It is better to keep the default SSID for better security measures.
Allow broadcast of the SSID.
Normally, the wireless access point regularly broadcasts the SSID so that the wireless devices will detect the network and join it when they come in range.
For a more secure network, you need to disable this functionality. But, the wireless client should know the SSID to join the network.
Choose channel
There is 11 channel available on which you can broadcast. Also, you need to keep your wireless access point and computer on the same channel.
But, if you are facing frequent disconnection issues, then you can switch to another channel. This happens because of the interference of other wireless devices in the same channel.
DHCP configuration
There is also an option of DHCP configuration, which you will find in most multifunction access points.
DHCP configuration is required when you have created a small network using a wireless access point. In such cases, you can simply enable the DHCP option.
But, in a larger network, the DHCP server in the access point is not suitable. For that, you need to have a separate DHCP server running on a separate computer.


