FTC disclaimer: This post contains affiliate links and I will be compensated if you make a purchase after clicking on my link.
To boot Windows 10 in safe mode, maybe new to some of the Windows users, but this feature is available since Windows 95.
While one can say it has evolved with all the future versions of the Windows, but the core remains the same.
Moreover, you may also find its presentation and accessibility has changed a lot with Windows 10 edition.
When you are using Windows 10 for the first time, you would like to install so many apps or try to remove, repair, or improve some of the system features or apps.
In this course of time, you may have encountered some of the problems like slow internet speed, virus attack, or some sort of bugs.
So, to solve or identify such problems, Windows 10 safe mode is needed.
What is the safe mode in Windows 10?
Windows 10 safe mode is an environment that allows you to diagnose problems with your Operating System.
Also, Windows 10 safe mode prevents your Windows problems from getting worse.
Remember, Windows 10 Safe Mode is not a high tech feature that requires a particular skill; instead, without any professional help, you can handle it.
Unlike traditional operating systems, when you boot your System and activate Windows 10 safe mode, then you cannot be able to access any third-party apps or drivers.
You can be able to access only Windows tools and features in Windows 10 safe mode.
After you have started Windows 10 in safe mode, now you can identify which apps are creating a problem or the problems are in the Windows operating system.
When to launch your computer in a safe mode?
There would be different instances you may experience while operating Windows 10. Safe mode is a diagnostic tool to troubleshoot the problem in Windows 10.
Although not every problem you can able to solve with Windows 10 safe mode, at least it would be the best place to start.
When you encounter any problem in a safe mode, then the issues are mostly related to the Windows default setting and drivers.
But, if the problem doesn’t replicate the same in safe mode, then probably the issue would be with third-party software and applications.
Sometimes you may be struggling with Windows 10 blue screen when you are trying to start up; then, this tool comes handy to solve it.
Moreover, if your Windows get infected with Malware, then “Windows Safe Mode” will be a great way to stop spreading or getting worse.
Similarly, you may encounter so many problems as hardware drivers got corrupted; one application is conflicting with another app, and so on.
Till now, we had learned what the purpose of Windows 10 safe mode is and when we needed the most.
Now, we will learn the procedure on how to start Windows 10 in safe mode.
How to Boot Windows 10 in safe mode
There are three ways to launch Windows 10 in safe mode:
- Boot Windows 10 in safe mode when you can’t boot normally
- Launch Windows 10 in safe mode via normal mode
- Boot in safe mode Windows 10 via the sign-in screen
Method 1: To Restart Windows 10 in safe mode when you can’t boot normally
This method is useful when you can’t be able to boot Windows normally, or you are facing a blue screen.
To launch Windows 10 in safe mode, follow the steps below:
Step 1: Press the power button to turn on the PC and press the power button down to turn off the PC. Remember, you have to hold the power button down for 5 seconds to turn off the PC.
Step 2: Repeat the above process for at least two times to launch an automatic repair screen. Moreover, the Automatic Repair Screen will shoot up in the first instance only when the Operating System faces any severe problem.
Step 3: Here, you can able to see the screen showing “Preparing automatic repair.” Mainly, here Windows try to repair by itself.

Step 4: Now, it will diagnose your PC for any problems. You have to wait till it gets completed.

Step 5: Here, you will see the startup repair screen. Now, you need to click on “Advanced option” to launch the Windows Recovery Environment (Windows RE) screen.

Step 6: On a Windows RE screen, click on “Troubleshoot.”

Step 7: Next, it will appear to troubleshoot the screen. Here, click on “Advanced option.”

Step 8: Now it will appear “Advanced options” screen, here click on “Startup settings.” This setting configures your Windows startup behavior.

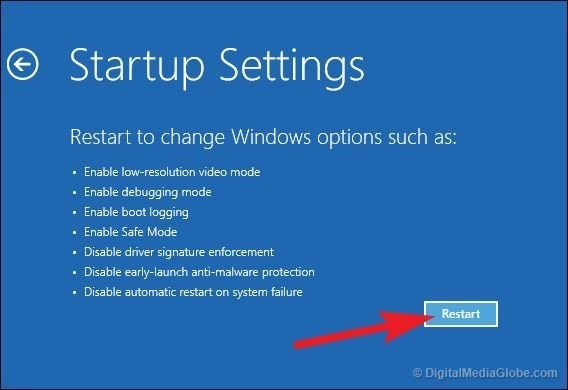
Step 8: In a “Startup Setting,” click on “Restart” to start showing different Windows options.

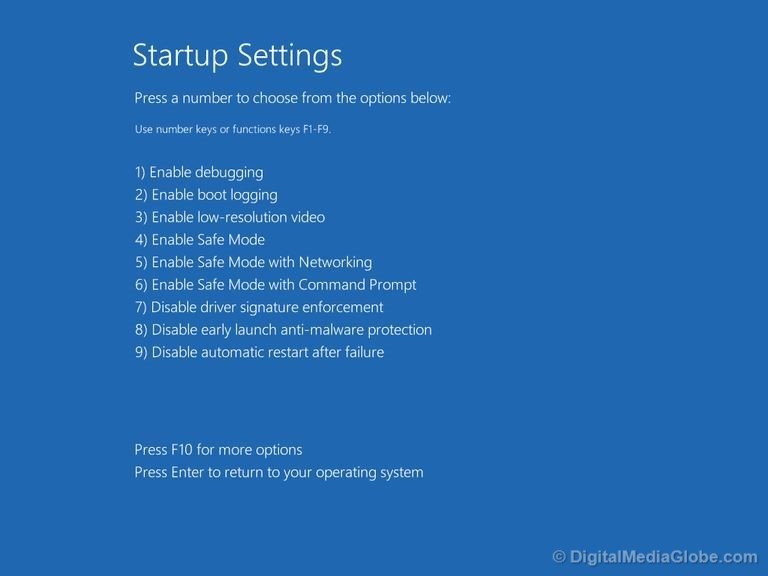
Step 9: Now, the “Startup Settings” screen will appear with a list of options. Here, if you would like to enable safe mode without network, then press four, or if you would like to let the safe mode with networking, then press 5.

Method 2: Launch Windows 10 in safe mode from normal mode
If your Windows 10 is starting as usual, but you still want to boot Windows in safe mode, then you can adopt the below methods.
- Using the system configuration tool
- Boot operating system with Advanced startup method
Method to set up the system configuration tool.
The system configuration tool will allow you to boot PC by setting up the boot procedure.
You can follow the below method to configure your system configuration tool.
Step 1: You can press Win + R to open the run dialog and then type in “MSConfig” and then click OK. It will open the System Configuration Tool.

Step 2: In a System Configuration Tool, click on the Boot tab. Here, check “Safe boot” under Boot options and then click OK.

Step 3: After that, it will prompt a window to restart your computer. Now, click on “Restart” to boot your computer in safe mode.

Note: If you don’t want to start your Windows in safe mode then uncheck “safe mode” in System configuration tool.
Boot operating system with Advanced startup method
Your next option starts Windows 10 in safe mode using Advanced startup. For this, you can follow the below method.
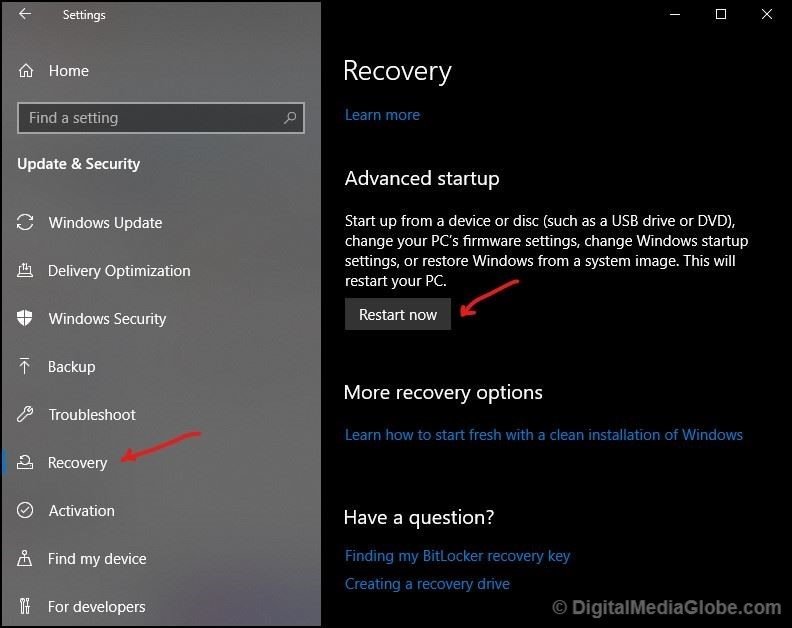
Step 1: Press Win + I to open Windows 10 setting and then click on “Update & Security.”

Step 2: Now, click on “Recovery” from the left pane and then move to “Advanced startup.” Here, click on “Restart now.”

Step 3: Next, follow step 6 to step 9 from method 1 to start Windows 10 in safe mode.
Method 3: Windows 10 in safe mode via the sign-in screen
Once you have started your PC and reached till login screen, then from here itself, you can able to start Windows in safe mode.
For this, you can follow the below steps.
Step 1: In the login screen, hold Shift key and click on the power button from the bottom right corner of the screen. Here click on the “Restart” option, it will open the Windows Recovery Environment (Windows RE) screen.

Step 2: Next, follow step 6 to step 9 from method 1 to start Windows 10 in safe mode.
Why can’t you able to start Windows 10 in safe mode using F8?
You would be wondering before we used to have an F8 button to start windows in safe mode.
But that method is applicable only till Windows 7.
After that, the F8 key to start Windows in safe mode has been disabled in Windows 10 version.
The only reason to do so is to keep the Windows boot time faster. As you can see, Windows 10 boot works more quickly than any other previous version of Windows.
But, Microsoft has not removed the F8 key option in Windows 10 version. It is still there, and the only thing you need to do is to activate it.
Remember, after activating the F8 key in Windows 10, the boot time will increase. But, if the F8 key is not needed, then, later on, you can disable it.
To enable or Disable F8 Advanced Boot Options in Windows 10, you can follow this tutorial.


