FTC disclaimer: This post contains affiliate links and I will be compensated if you make a purchase after clicking on my link.
You would wonder how to assign a static IP address to your device and stop changing your device IP address.
A device’s IP address automatically gets changed when it is assigned with a dynamic IP address. If the device is assigned with a static IP address, then it will remain unchanged.
In some of the cases, assigning a static IP address helps complete some of the tasks.
The dynamic IP address is assigned automatically to your device using a DHCP protocol (Dynamic Host Control Protocol).
Why do we need a static IP address?
The static IP address has some advantages over the dynamic IP address.
- You can easily access your computer from the same network or internet.
- You can use your computer as a server.
- Access to other devices like a network printer or NAS is easier.
You can follow this guide if you want to know more about the difference between static and dynamic IP addresses.
Which IP address to choose?
A device can have two types of IP address: Public IP address and Private IP address.
The public IP address is assigned by your ISPs (Internet Service Providers). Generally, ISPs assign you with the dynamic IP address, but if you require a static IP address, you must forward an addition required to your ISPs.
The static IP address would be costly for a Public IP address.
The second one is the Private IP address assigned directly by your network router using DHCP protocol.
The internal IP address which is private to your network must be unique in your network.
If you don’t know what your internal IP address is, then you can follow this tutorial.
For instance, let’s suppose the internal IP address is 192.168.1.8. Here, the first three parts of the IP address will remain unchanged, and the last part of the IP address varies from 0 to 255.
So, the IP address variation would be like 192.168.1.1, 192.168.1.5, 192.168.1.9, and so on.
How to assign static IP address on Windows 10/8/7
Assigning an IP address on Windows can be done using two methods:
- Using command prompt
- Through Network and sharing center
Using Command prompt
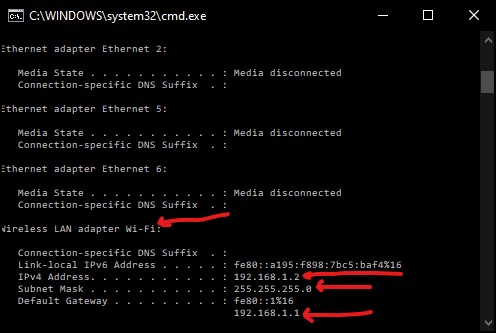
The command prompt method is the quickest method. For this, you need three things: subnet mask, default gateway, and network adapter name.
If you are in a wireless network, the network adapter name would probably be “wi fi.”
You can check out the detail using the command prompt command.
ipconfig
From the above illustration, you can note that the network adapter name is “Wi-fi.” And the subnet mask and default gateway are 255.255.255.0 and 192.168.1.1.
Now, let’s suppose the static IP address would be 192.168.1.2, then the command would be as below.
netsh interface IP set address name="wi-fi" static 192.168.1.106 255.255.255.0 192.168.1.1
This will change the current IP address or, as specified by you, to a static IP address. It means that previously it was assigned by DHCP automatically, but now it was configured manually.
Through Network and sharing center
Step 1 (a): For Windows 10/8
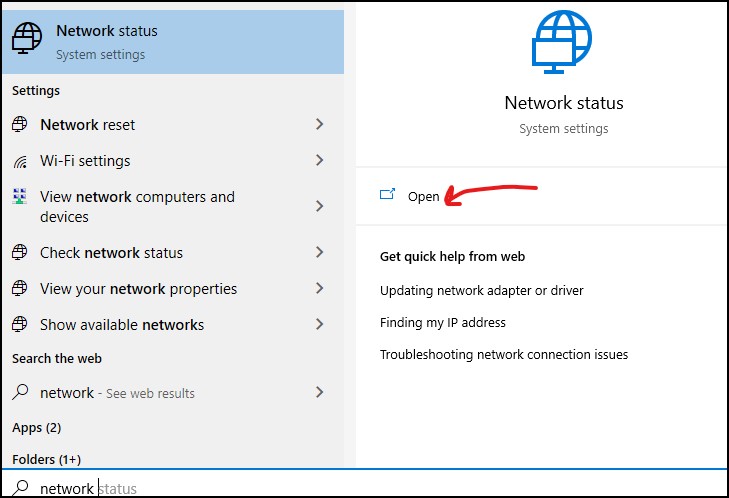
If you are using Windows 10 or 8, press Win + S, type in “network,” and click on the “network status” tab to open it.
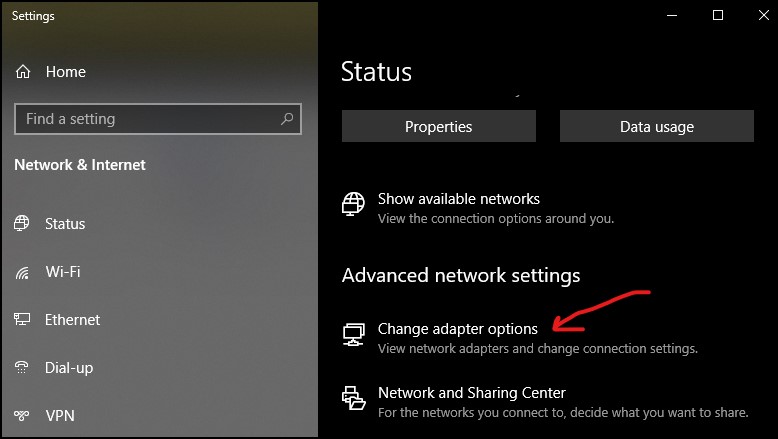
After that, you have to look for “change adapter options” in the “Advanced network setting.”
Step 1 (b): For Windows 7 and beyond.
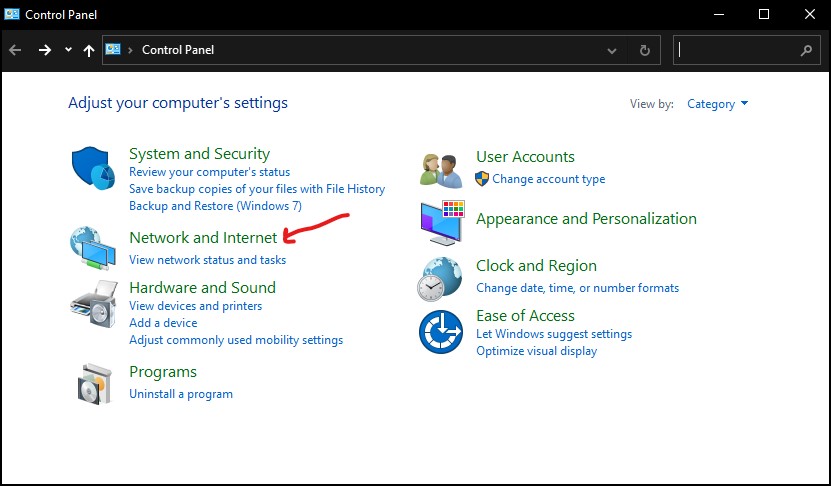
For Windows 7 and beyond, you have to click on “Start” and then look for the “control panel.” In Control Panel, click on “Network and Internet.”
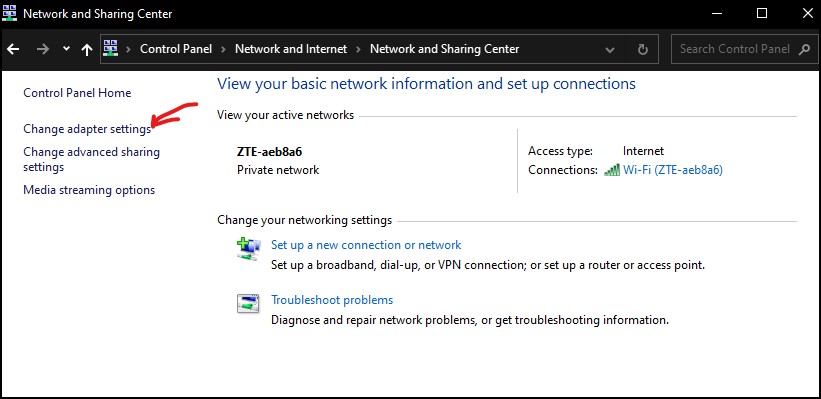
After that, click on “Network and Sharing Center,” Then, from the left pane, select “Change adapter settings.”
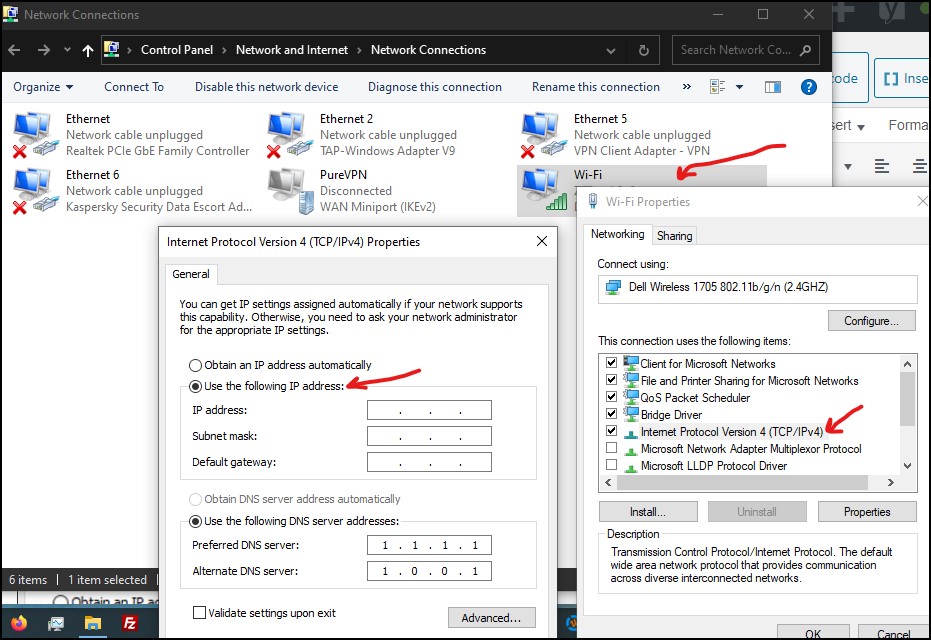
Step 2: Once you have opened the network adapter setting, right-click on the active network adapter. Here, in this case, it is Wi-fi.
Step 3: After right-click, click on b and then double click on b. It will open a pop-up window.
Now, select “Use the following IP address” and fill in the details such as IP address, Subnet mask, Default gateway.
If you would like to switch back to a dynamic IP address, then choose the option “Obtain the IP address automatically.”
