FTC disclaimer: This post contains affiliate links and I will be compensated if you make a purchase after clicking on my link.
There would be many reasons why you want to change the DNS server. Some of the most common reasons would be security challenges and other would-be speed improvements.
You can change DNS server addresses on almost all devices such as Windows (all version), Mac OS, iPhone, iPad, Android devices, and Chromebook.
By default, the Internet Service Providers (ISP) automatically set the necessary network settings, including the DNS server addresses.
But, the ISP DNS servers would be slow, unreliable, and cannot be private.
For private and secure DNS servers, you have to use your own DNS server or look for third-party DNS services such as Google DNS server.
The custom DNS server or private DNS server will improve your internet speed and give better experiences by removing the congestion.
What is DNS and DNS server?
DNS stands for Domain Name System. It let the user connect with the internet using a domain name instead of IP addresses.
Every device, who likes to connect with the internet needs an IP address. But, it is difficult to remember the IP addresses of all the websites.
The DNS server provides the mechanism that will translate the friendly domain name into the IP address, such as for DigitalMediaGlobe.com.
When you type any domain name on your web browsers, it will first contact the DNS server. The DNS server will translate the domain name into an IP address and sent it to the browser.
After receiving the IP addresses from the DNS server, it will connect to the site and display its content.
The whole process complete in milliseconds, so you won’t be able to notice the changes.
Let’s look into the process how to change the DNS server on the router and other devices.
How to change the DNS server on the router?
Changing the DNS server on your router will change the DNS server of your entire home network.
Your home network devices such as PCs, smartphones, tablets, smart speakers, game consoles are all connected to your router.
If you want to change the DNS server on all your devices, it is better to change the router. The devices connected with the router will acquire the DNS setting from your router.
If you have changed your mind, you only need to change it on your router.
By default, your router uses a DNS server provided by your ISP (Internet Service Provider).
To change your router DNS server, you have to access the router’s web interface. The web interface of your router will vary depending on the type of router and brand.
But, the essence of the process will remain the same. Here, we have taken the Netgear router example.
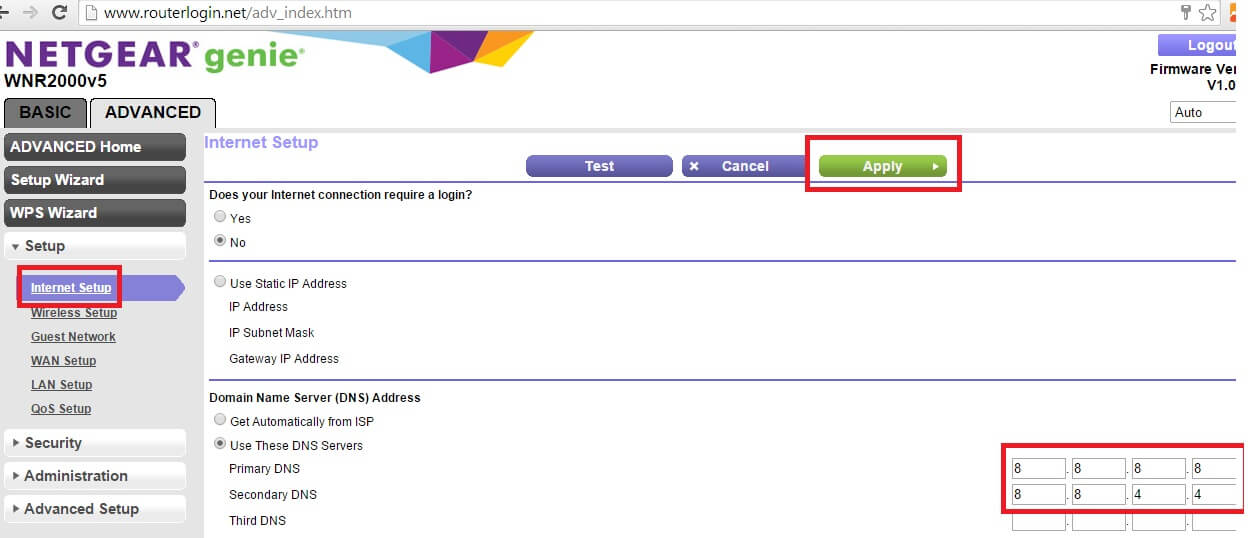
Step 1: To access the Netgear router’s web interface, you have to visit routerlogin.net and enter your username and password.
Mostly, the default username and passwords are “admin” and “password.”
Step 2: Now, you have to select “Internet” to display the Internet Setup page.
On this page, you have to go under the Domain Name Server (DNS) address section. Here, select “Use these DNS Server.”
You will find DNS settings under the “LAN” or “DHCP” section in other routers. DNS server setting is provided by DHCP protocol to all the connected devices.
Step 3: Enter your primary and secondary DNS addresses. We are using here Google DNS 8.8.8.8 and 8.8.4.4.
If you are still having trouble finding DNS server settings, then better look into your router manual or search your router model name.
How to change DNS server in Windows 10
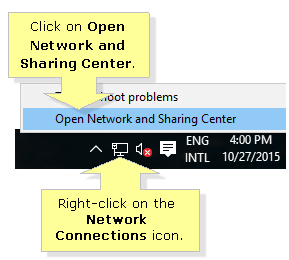
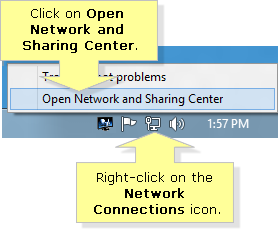
Step 1: You have to right-click on “Network Connections” and then click on “Open Network and Sharing Center.”
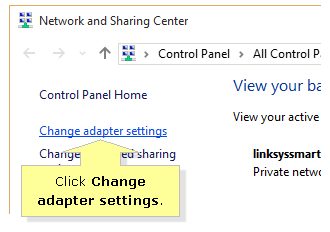
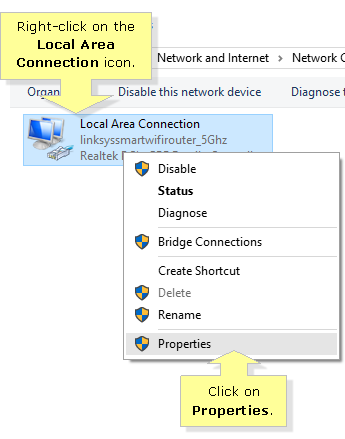
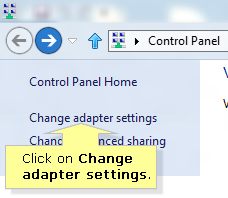
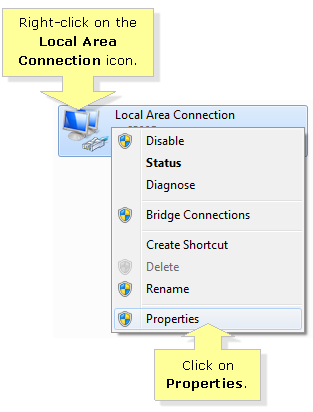
Step 2: Now, you have to click on “Change adapter settings” and then right-click on the “Local Area Connection” icon. After that, click on “Properties.”
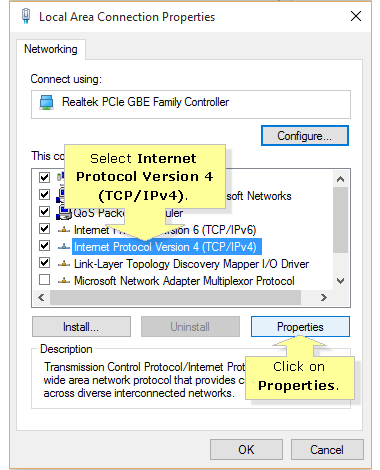
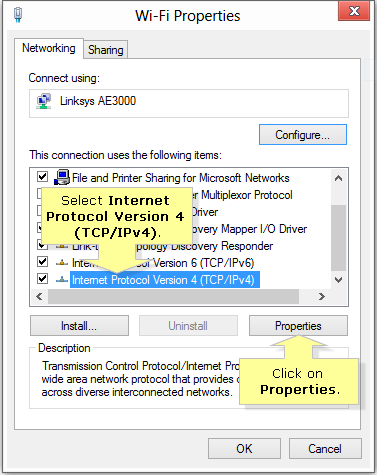
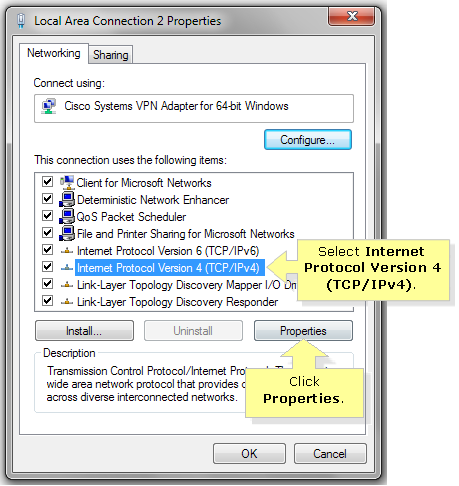
Step 3: In properties, select “Internet Protocol Version 4 (TCP/IPv4)” and then click on “Properties.”
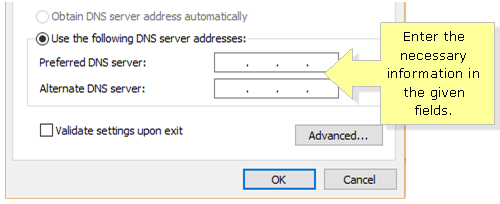
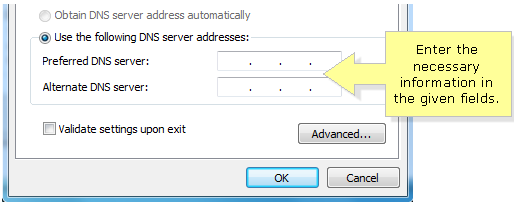
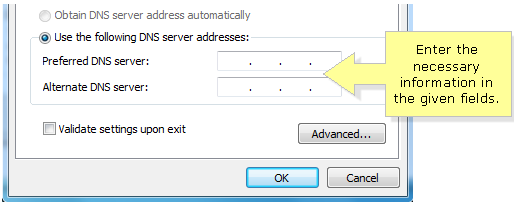
Step 4: Here, select the “Use the following DNS server addresses” option and then enter “Preferred DNS server” and “Alternative DNS server.” After that, click OK.
How to change DNS server in Windows 8/8.1?
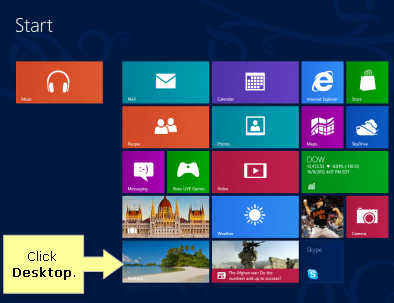
Step 1: You have to press Windows key + D, which will show Desktop. On the desktop, right-click on the “Network Connection” icon and then click “Open Network and Sharing Center.”
Step 2: Now, click “change adapter settings.” After that, right-click on the “Ethernet adapter” icon and then click on “Properties.”
Step 3: In properties, you have to click on “Internet Protocol Version 4 (TCP/IPv4)” and then click on “Properties.” Now, select “Use the following DNS server addresses” and enter “Preferred DNS server” and “Alternative DNS server,” and then click OK.
How to change DNS server in Windows 7/ Vista?
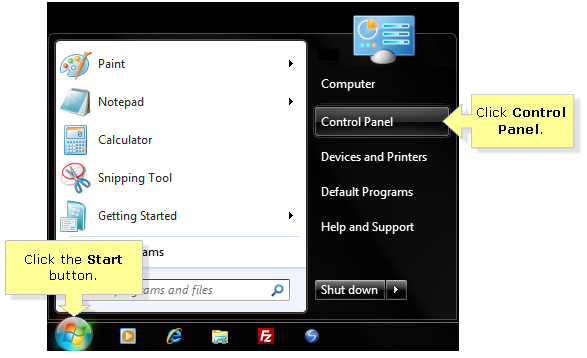
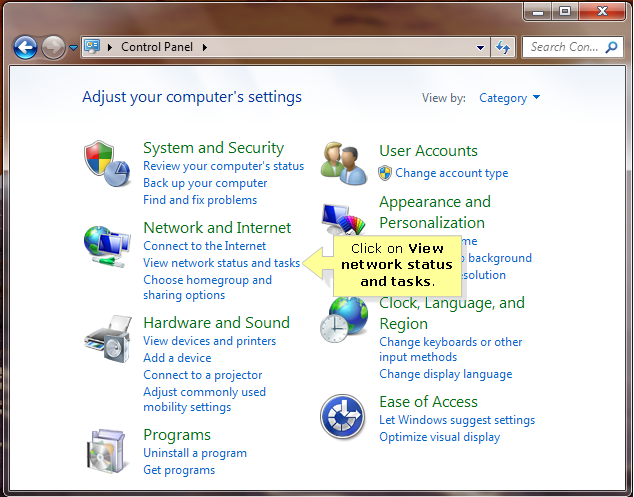
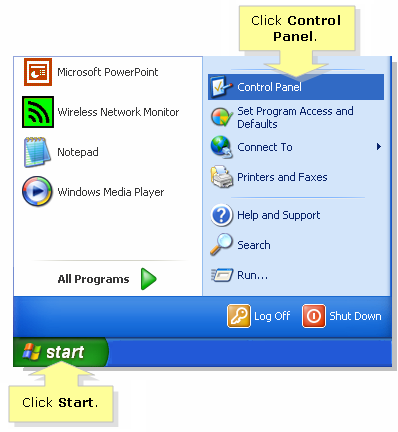
Step 1: You have to click on “start” and then click “Control Panel.” In Control Panel Windows, you can click on “View network status and tasks.”
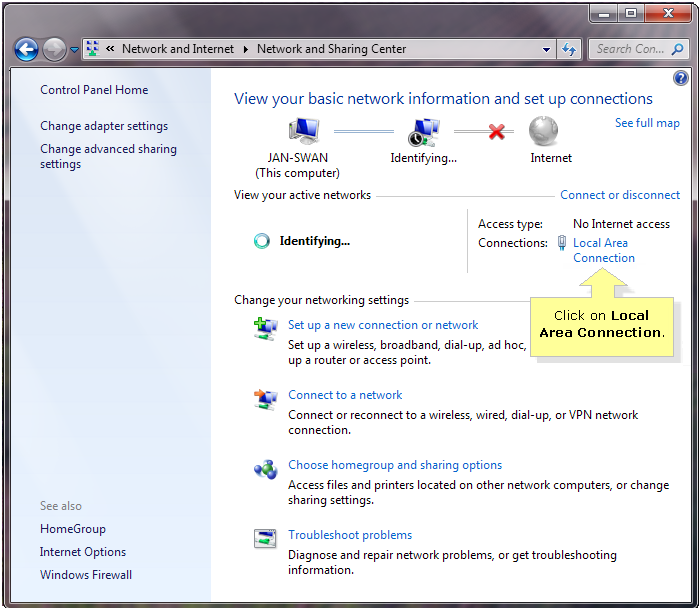
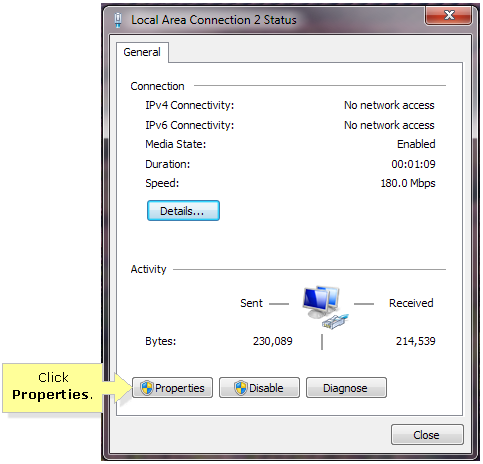
Step 2: Now, click on “Local Area Connection” and then click “Properties.”
Step 3: In properties, select “Internet Protocol Version 4 (TCP/IPv4)” and then click the “Properties” button. After that, click “Use the following DNS server addresses” and enter the preferred and alternative DNS server IP addresses.
How to change DNS server in Windows XP?
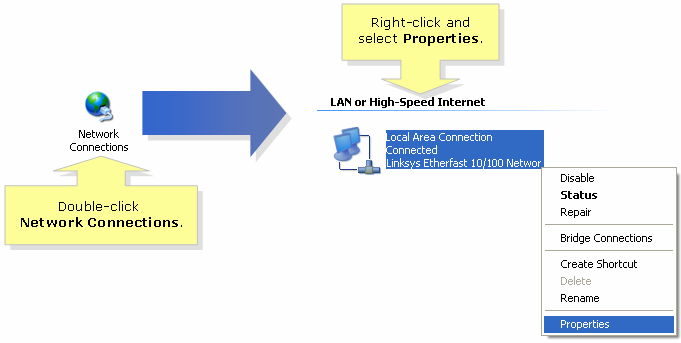
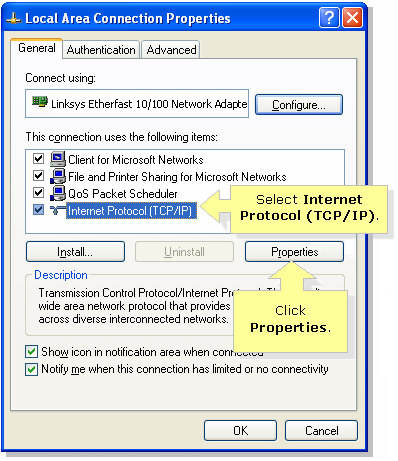
Step 1: You have to click “Start” and then click “Control Panel.” In the “Control Panel” window, you have to double-click on “Network Connections” and then right-click on “Local Area Connection” and select “Properties.”
Step 2: In the “Local Area Connection Properties” window, select Internet Protocol (TCP/Ip) and then click “Properties.”
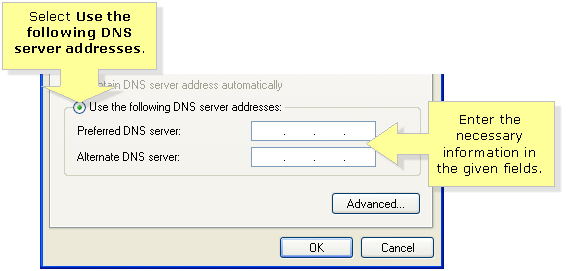
Step 3: Now, select “Use the following DNS server addresses” and enter the preferred and alternative DNS server IP addresses.
How to change DNS server on Mac OS
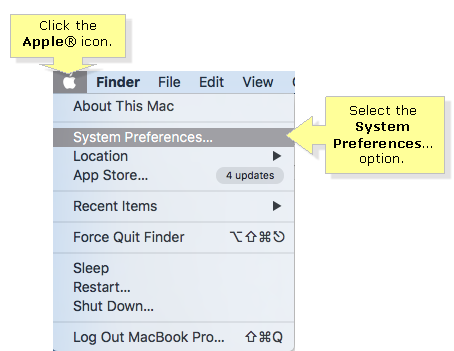
Step 1: You have to click on the “Apple” icon at the top left corner of the screen and then select the “System Preferences” option.
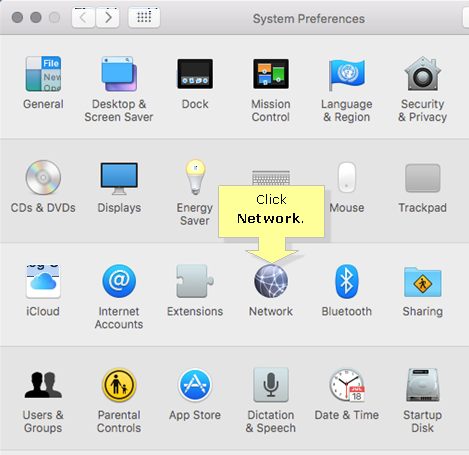
Step 2: In the “system preferences” window, select “Network.”
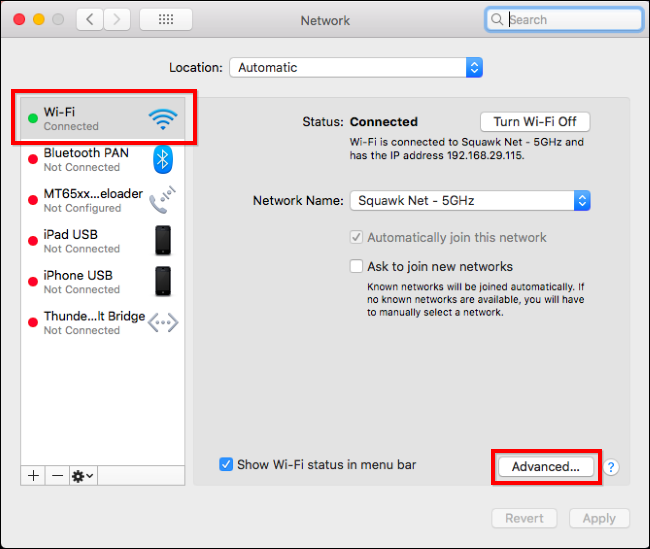
Step 3: On the “network” window, you have to select “Automatic” for the “Location” drop-down and then select the network adapter you want to change, such as “Wi-Fi” from the left pane. After that, select “Advanced.”
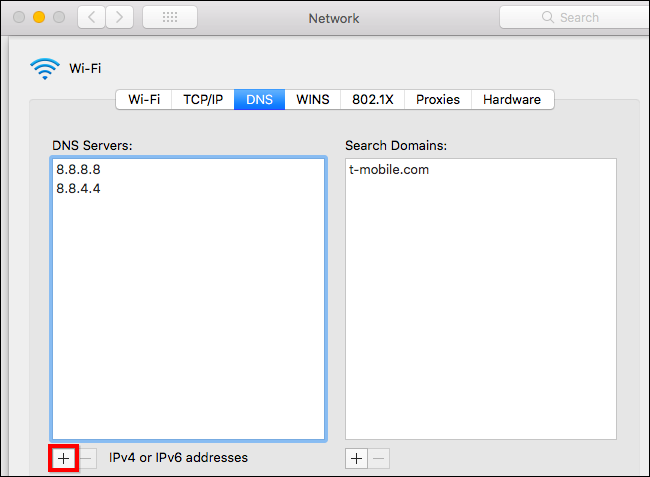
Step 4: In the Advanced window, you have to select “DNS.” You have to click on the “+” button and then add IPv4 or IPv6 addresses. After that, click “OK” to save the changes.
If the new DNS server’s record is not working, you have to reset your DNS cache on Mac.
How to change DNS server on iPhone or iPad?
Apple iOS allows you to set the preferred DNS server but for only one network connection at a time.
You cannot change the DNS server for the whole network connection like in Windows operating system.
So, you have to select the network connection, such as the Wifi network you are using.
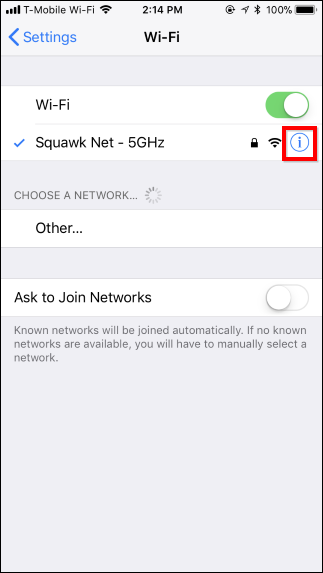
Step 1: You can change the DNS server on iPhone or iPad by going to the “Setting” and then select the “WiFi” network you are connected to or using currently.
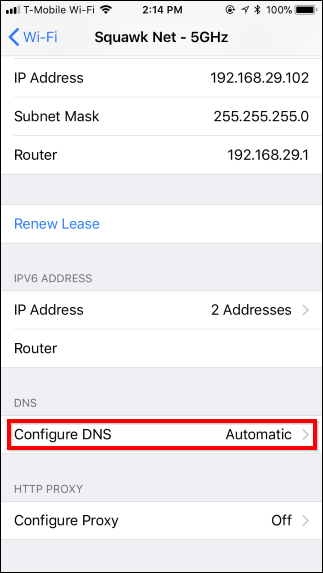
After that, tap on the “i” button next to the selected network, which you want to configure. Next, scroll down and select the “Configure DNS” option under the DNS section.
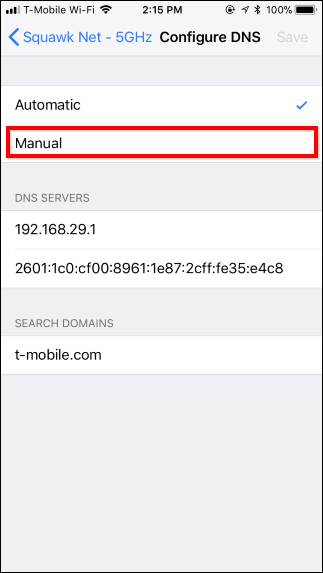
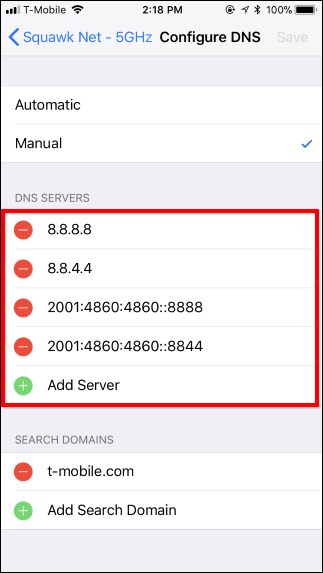
Step 2: In the configure DNS window, you have to select “Manual” and then add “DNS server” you want to use. Also, remove the unwanted DNS server from the list.
Moreover, it supports both IPv4 and IPv6 addresses. After adding DNS server addresses, you have to tap the “Save” button to complete the configuration.
How to change DNS server on the Android Phone or Tablet
Similar to iOS, the Android phone also doesn’t allow you to change the DNS server system-wide.
If you want to change the DNS server in an Android phone, you have to select an individual Wi-Fi network.
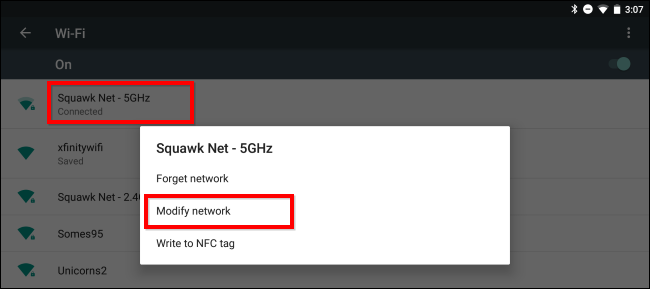
Step 1: To change the DNS server in Android mobile phone, you have to go the “Setting” and then long press “WiFi” to open a pop-up window. After that, you have to select “Modify Network.”
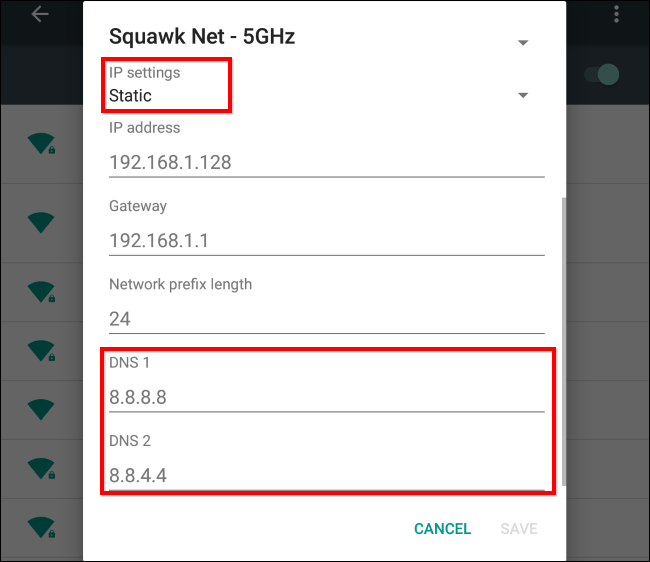
Step 2: To set a static DNS server, you have to select “IP settings” and change it to “static” instead of “dynamic.”
Here, the IP address settings are automatically acquired by the DHCP server.
Now, you have to enter the primary and secondary DNS servers in “DNS 1” and “DNS 2” and then save the settings.
How to change DNS server in Chromebook?
Like iPhone, iPad, and Android devices, you can also change the DNS server in Chromebook for individual Wi-Fi networks.
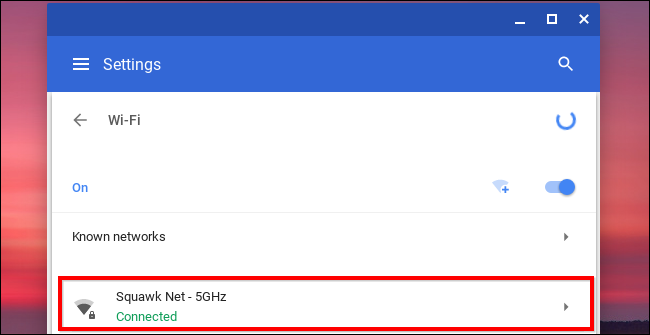
Step 1: In a Chromebook, select “Settings” and then “Wi-Fi.” You have to select the WiFi network where you want the changes to happen.
Step 2: On clicking the “network” header, it will expand. Now, select the “Nameservers” section.
After that, click the dropbox showing “Automatic Name servers” and then either select “Google name servers” or “Custom name servers.”
The “custom name servers” help you enter the DNS servers you want to use.
Conclusion
Changing DNS server settings in most devices is intuitive and straightforward. Most of the devices have their own built-in options to set or change DNS servers.
You need to look into the network connection section and then look for the custom DNS server, if available.
