FTC disclaimer: This post contains affiliate links and I will be compensated if you make a purchase after clicking on my link.
Checking an IP address of a computer is the first step to determine whether the computer is connected properly with a router or not.
Before checking your computer IP address, you need to confirm that your computer is connected wired or wirelessly to your router.
We will check the computer IP address depending on your computer’s operating system.
The list of computer’s operating system we will consider here are:
- Windows 10
- Windows 8/8.1
- Windows 7/vista
- Windows XP
- OS X
How to check IP address in Windows 10
There are two ways to check IP addresses in Windows 10 operating system.
- Command prompt
- Network Connection
Check IP address in Windows 10 using command prompt.
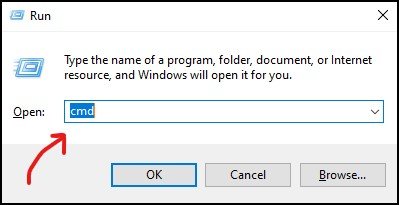
Step 1: Press Windows key + R simultaneously and then type in CMD to open the command prompt.
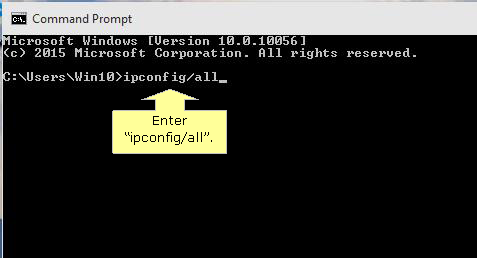
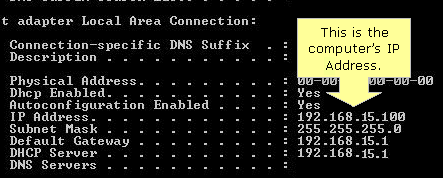
Step 2: On the Command Prompt, type in “IPCONFIG/ALL” and then press ENTER.
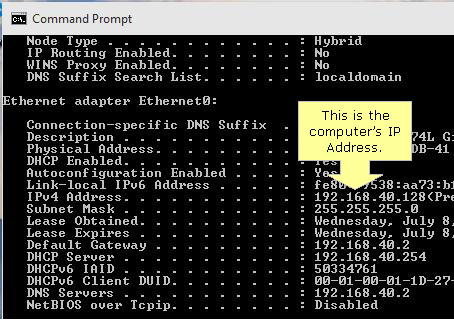
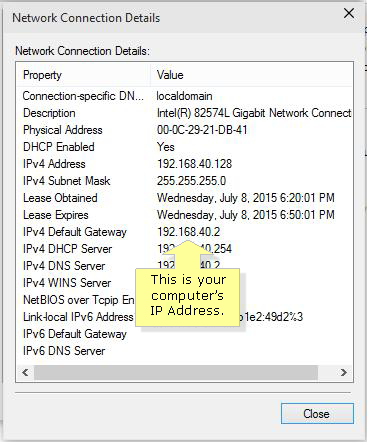
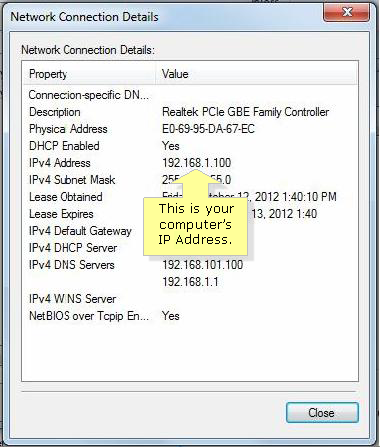
Step 3: You need to check the computer’s IP address in the IPv4 Address section.
You need to confirm that the first three octets of an IP address are the same as the default gateway.
Moreover, if your computer is getting an IP address such as 0.0.0.0 or 169.254.xxx.xxx then you need to release or renew your current IP address.
How to check IP address in Windows 10 through Network Connections
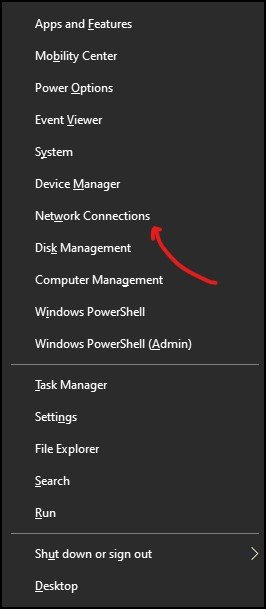
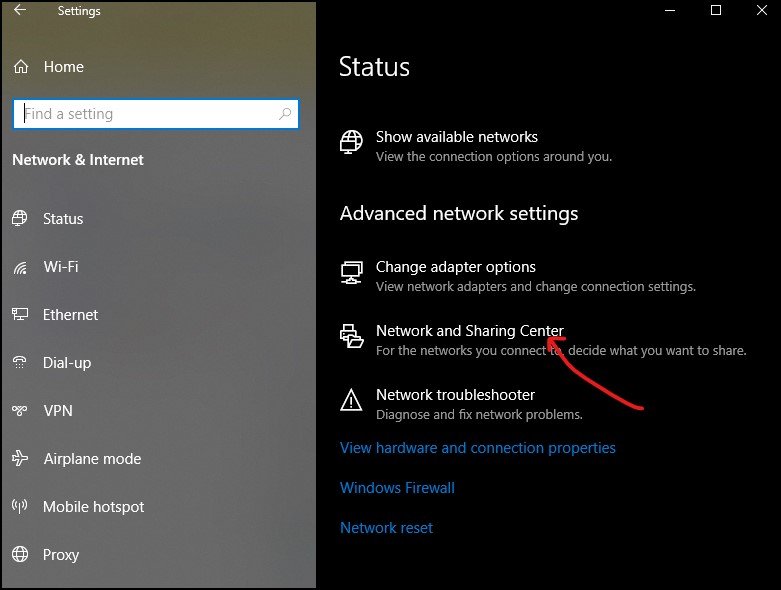
Step 1: Press Windows Key + X and then click on “Network Connection.” It will open a window, then look for “Network and sharing center” under “Advanced Network Settings.”
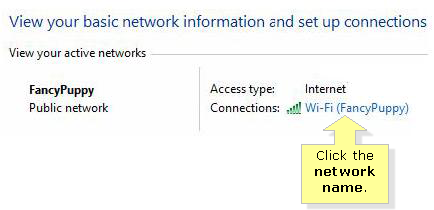
Step 2: After clicking on “Network and Sharing Center,” it will open up windows showing your current active networks. Here, you have to click on the network name near “Connections.”
The network name will depend upon which network you have connected currently and what you have set the name for that network.
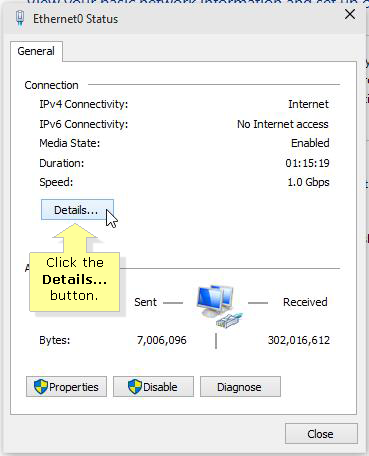
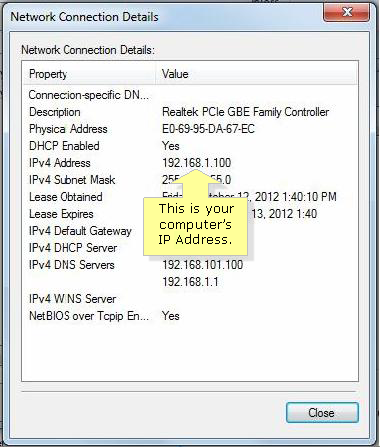
Step 3: On clicking on the “Details” button, it will open up the “Network Connection Details” window showing the IPv4 address.
How to check the IP address on Windows 8/8.1
In Windows 8/8.1, you will also look for the computer’s IP address in two ways.
- Using command prompt
- Going through Network Connections
Check IP address on Windows 8/8.1 using command prompt.
Step1: Press Windows Key and type in “Command prompt” to display the command prompt shortcut.
Step 2: Next, click on “Command Prompt” and then type in “IPCONFIG/ALL” and then press ENTER, as we have done in the previous section.
Step 3: Now, it will open up the command prompt window showing up the IP address in the IPv4 address section.
Check IP address on Windows 8/8.1 using Network Connections.
Step 1: Press Windows Key + D to go to the desktop and look for the network connection icon. After that, right-click on the network connection icon and then click on the “Open Network and Sharing Center” option.
For wired and wireless, there would be two different icons.
Step 2: You have to look for “Connections” and then click on the network name.
Step 3: After clicking on “Details,” look for IPv4 Address in the “Network Connection Details” window.
How to check IP address in Windows 7/Vista
In Windows 7/Vista, you can check IP addresses in two ways: Command Prompt and Network Connections method.
Check IP address in Windows 7 using command prompt.
Step 1: You have to click on the “Windows” button and then enter “Command Prompt” in the start search window. Press Enter to open a command prompt.
Step 2: On the Command Prompt window, type in “IPCONFIG/ALL” and press Enter. After that, check for the IPv4 Address section.
Check IP address in Windows 7/Vista through Network Connections.
Step 1: Open “Network and Sharing Center” by clicking the Network icon.
Step 2: Look for Connections and then click on the network name. After that, click on “Details” to look for the IPv4 address on the Network Connection Details.
How to check IP address in Windows XP
Through Command Prompt method
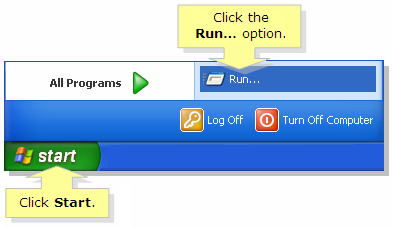
Step 1: Click on “Start” and then click on the Run option. In a Run window, type in “cmd” to open a command prompt.
Step 2: In the Command Prompt, type “IPconfig/all” and press Enter to look for the IP address.
Through the Network Connection method
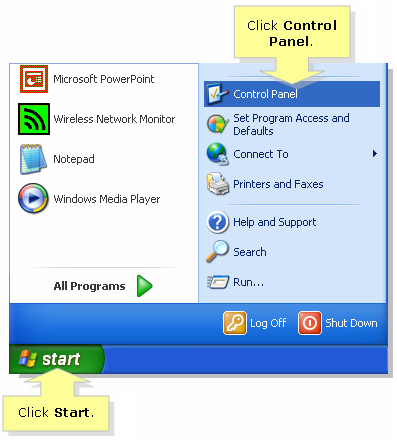
Step 1: You need to click on “Start” and then “Control Panel.”
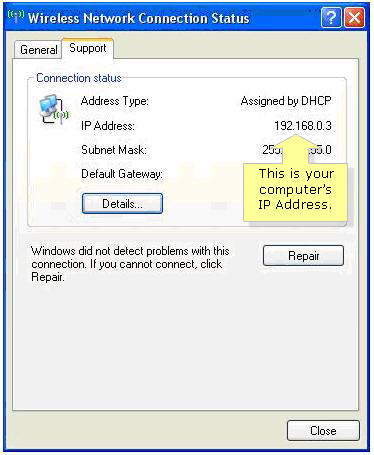
Step 2: Now, you have to double-click on the “Network Connections” icon and then right-click on “Wireless Network Connection” and select the “Status.”
Step 3: In the open window, you have to click on the “Support” tab. The “IP Address” will show you the computer’s IP address, and the Default Gateway shows the router’s IP address.
How to check IP address in Mac OS X
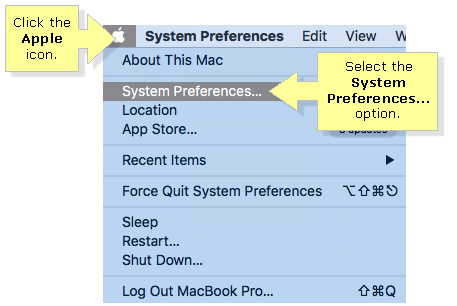
Step 1: You have to click on the Apple icon and then select the “System Preferences” option.
Step 2: You have to click on the “Network” icon
For Wired connection: You have to click on Ethernet and then look for “IP address” for the computer’s IP address and “Router” for the router’s IP address.
For Wireless connection: You have to click for Wi-Fi and click on the “Advanced” button. After that, click on TCP/IP (Transmission Control Protocol/Internet Protocol) tab.
Now, the “IPv4 Address” will show your computer’s IP address in Mac OS, and the “Router” will show your router’s IP address.
